
Gallery A83-SILVER/1/21510/15+1SW
Gallery Empress Crystal Chandelier Instruction Manual
Model: A83-SILVER/1/21510/15+1SW
1. Gabatarwa
This manual provides comprehensive instructions for the safe installation, operation, and maintenance of your Gallery Empress Crystal Chandelier, Model A83-SILVER/1/21510/15+1SW. Please read all instructions carefully before beginning installation and retain this manual for future reference.
The Gallery Empress Crystal Chandelier is a sophisticated lighting fixture designed to enhance various indoor spaces such as bedrooms, dining rooms, and living rooms. It features Empress Crystal components, known for their clarity and light reflection properties.
2. Muhimman Bayanan Tsaro
WARNING: RISK OF ELECTRIC SHOCK. DISCONNECT POWER AT THE FUSE BOX OR CIRCUIT BREAKER BEFORE INSTALLATION OR SERVICING.
- Installation must be performed by a qualified electrician or a person with experience in electrical wiring.
- Ensure the mounting surface can support the weight of the chandelier.
- Kada a haɗa wannan na'urar da tsarin wutar lantarki mara tushe.
- Handle crystal components with care to prevent breakage or injury.
- Kada ku wuce iyakar wattage specified for bulbs (40 watts per bulb).
- Ajiye kayan tattarawa daga yara.
3. Abubuwan Kunshin
Carefully unpack all components and inspect for any damage. Retain all packaging materials until you are satisfied with the product. If any parts are missing or damaged, contact Gallery customer support immediately.
- Chandelier Frame (Silver finish)
- Empress Crystal components (various shapes and sizes)
- Kit ɗin kayan masarufi
- Assembly diagram and instructions (provided by Gallery)
- Note: Light bulbs are typically not included. Please refer to the "Specifications" section for compatible bulb types.
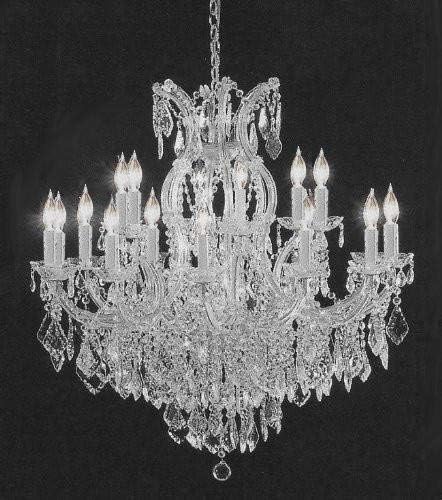
Hoto na 1: Assembled Gallery Empress Crystal Chandelier. This image illustrates the complete chandelier with its crystal elements and light sockets.
4. Umarnin Shigarwa
Assembly of this chandelier requires careful attention to detail and patience. It is highly recommended to have two people for installation. Refer to the included Gallery-verified diagram and instructions for specific steps.
4.1. Kayan aiki da ake buƙata (Ba a haɗa su ba)
- Screwdriver (Phillips da Flathead)
- Masu yankan waya
- Pliers
- Tef ɗin lantarki
- Tsani
- Gloves (optional, for handling crystals)
4.2. Matakai Kafin Shigarwa
- Kashe Wuta: Locate the circuit breaker or fuse box and turn off the power to the junction box where the chandelier will be installed. Verify power is off using a voltage gwajin.
- Review Zane: Carefully study the provided assembly diagram and instructions. Familiarize yourself with all components and their intended placement.
- Shirya Abubuwan: Lay out all chandelier components on a clean, soft surface to prevent scratches.
4.3. Hawan Fixture
- Attach the mounting bracket to the ceiling junction box using the provided screws. Ensure it is securely fastened.
- Haɗa wayoyin lantarki:
- Connect the bare copper ground wire from the fixture to the ground wire from the junction box (usually bare copper or green).
- Haɗa wayar fari (tsaka-tsaki) daga kayan haɗin zuwa wayar fari (tsaka-tsaki) daga akwatin haɗin.
- Haɗa wayar baƙi (mai rai) daga na'urar zuwa wayar baƙi (mai rai) daga akwatin mahaɗin.
- Kiyaye duk haɗin kai tare da goro na waya da tef ɗin lantarki.
- Carefully lift the chandelier frame and attach it to the mounting bracket, following the specific instructions in your diagram. Ensure all connections are tight and secure.
4.4. Attaching Crystal Components
This step requires significant time and precision. The Empress Crystal components are individually attached to the chandelier frame. Refer to the provided diagram for the correct placement of each crystal strand and individual crystal piece.
- Identify the different crystal shapes and sizes.
- Match each crystal component to its corresponding hook or attachment point on the chandelier frame as indicated in the diagram.
- Gently attach each crystal, ensuring it is securely fastened. Avoid forcing components.
- Note: Some crystal strands may require minor adjustments or re-arrangement to achieve the desired aesthetic.
4.5. Sanya Hasken Haske
- Once all crystals are in place, carefully screw in the appropriate E12 candelabra base bulbs (not included) into each socket.
- Kada ku wuce watts 40 a kowace kwan fitila.
4.6. Duban Ƙarshe
Before restoring power, double-check all electrical connections and ensure all crystal components are securely attached. Clear the work area of tools and debris.
5. Aiki
After successful installation, restore power at the circuit breaker. The chandelier can be operated using a standard wall switch connected to the fixture's electrical circuit. This model supports various bulb types including LED, incandescent, halogen, and compact fluorescent bulbs.
The chandelier is designed for indoor use only and features a touch control method, implying it can be integrated with compatible touch-sensitive wall switches or dimmers (sold separately) if desired. Consult a qualified electrician for dimmer compatibility and installation.
6. Kulawa da Kulawa
Regular cleaning will help maintain the brilliance of your Empress Crystal Chandelier.
- Tsaftace Firam: Dust the metal frame with a soft, dry cloth. For more thorough cleaning, lightly dampen a cloth with a mild, non-abrasive cleaner and wipe gently. Dry immediately.
- Cleaning the Crystals:
- Turn off the power to the chandelier before cleaning.
- Use a soft, lint-free cloth or a specialized crystal cleaning glove.
- For deeper cleaning, spray a crystal cleaning solution onto a cloth (not directly onto the crystals or electrical components) and gently wipe each crystal.
- Avoid harsh chemicals or abrasive materials, as these can damage the crystal finish.
- Sauyawa Bulb: Always turn off power before replacing bulbs. Allow old bulbs to cool completely before removal. Use only E12 candelabra base bulbs, not exceeding 40 watts.
7. Shirya matsala
Idan kun haɗu da matsaloli tare da chandelier ɗinku, duba waɗannan matsalolin da mafita na yau da kullun:
| Matsala | Dalili mai yiwuwa | Magani |
|---|---|---|
| Chandelier ba ya haskakawa. |
|
|
| Fitilar fitillu. |
|
|
| Lu'ulu'u suna bayyana ba su da kyau. |
|
|
If troubleshooting steps do not resolve the issue, please contact Gallery technical support.
8. Ƙayyadaddun bayanai
| Alamar | Gallery |
| Lambar Samfura | A83-SILVER/1/21510/15+1SW |
| Girma (H x W) | 38 inci (tsawo) x 37 inci (Nisa) |
| Kayan abu | Crystal |
| Nau'in Ƙarshe | Crystal (Silver frame) |
| Yawan Haske | 16 |
| Tushen Bulb | E12 Candelabra |
| Max Wattagda Bulb | 40 Watts |
| Nau'in Kwan fitila masu jituwa | LED, Incandescent, Halogen, Compact Fluorescent |
| Voltage | 120 Volts |
| Nau'in Shigarwa | Dutsen Rabin Ruwa / Dutsen Rufi |
| Amfanin Cikin Gida/Waje | Cikin gida |
| Ana Bukatar Taro | Ee |
| UPC | 804879403739 |
9. Garanti Bayani
Your Gallery Empress Crystal Chandelier is backed by a Gallery warranty (Established 1978). Each item comes with a Certificate of Authenticity, certifying this product as an authentic Gallery lighting fixture. For specific warranty terms and conditions, please refer to the documentation included with your purchase or contact Gallery customer support.
10. Tallafin Abokin Ciniki
For any questions regarding installation, operation, maintenance, or troubleshooting, Gallery provides dedicated technical support.
Toll-Free Technical Support Number: 1-800-XXX-XXX (Please refer to your product packaging or Certificate of Authenticity for the exact number.)
When contacting support, please have your model number (A83-SILVER/1/21510/15+1SW) and purchase information readily available.
Ask a question about this manual
Ask about setup, troubleshooting, compatibility, parts, safety, or missing instructions. Manuals+ will review the question and use this page’s manual context to help answer it.