Midiplus Origin 37
midiplus Origin 37 USB MIDI Keyboard Controller User Manual
Model: Origin 37 | Brand: Midiplus
1. Gabatarwa
The midiplus Origin 37 is a versatile USB MIDI Keyboard Controller designed for musicians and producers. It features 37 full-size sensitive keys, 8 real-time controller knobs, 9 real-time controller sliders, and essential performance controls like pitch bend and modulation wheels. This manual provides detailed instructions for setting up, operating, and maintaining your Origin 37 controller to ensure optimal performance and longevity.
2. Bayanin Tsaro
- Kada a bijirar da naúrar ga ruwan sama, danshi, ko matsanancin zafi.
- Guji sanya naúrar kusa da tushen zafi kamar radiators, rajistan zafi, murhu, ko wasu na'urori (ciki har da amplifiers) masu samar da zafi.
- Yi amfani da haɗe-haɗe/na'urorin haɗi kawai da mai ƙira ya ƙayyade.
- Tsaftace kawai da bushe bushe.
- Kar a toshe kowane buɗewar samun iska. Shigar daidai da umarnin masana'anta.
- Kare igiyar wutar lantarki daga tafiya a kai ko a dunƙule, musamman a matosai, madaidaitan ma'auni, da wurin da suke fita daga na'urar.
- Cire wannan na'urar yayin guguwar walƙiya ko lokacin da ba a yi amfani da ita na dogon lokaci ba.
3. Abubuwan Kunshin
Da fatan za a bincika cewa duk abubuwan da aka jera a ƙasa suna cikin kunshin ku:
- midiplus Origin 37 USB MIDI Keyboard Controller
- Kebul na USB
- Manual's Owner's (wannan takarda)
4. Samfurin Ya Ƙareview
Familiarize yourself with the various components and controls of your Origin 37 controller.
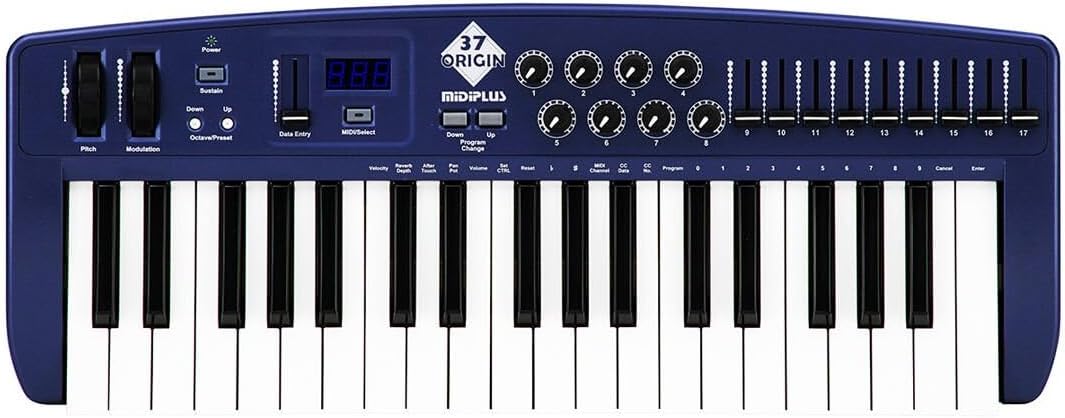
Hoto 4.1: Sama-sama view of the midiplus Origin 37, showing the 37 keys, pitch and modulation wheels, control knobs, sliders, and display.
4.1 Gudanar da Ƙungiyar Gaba
- 37 Full-Size Sensitive Keys: Standard piano-style keys for playing notes.
- Farar Bend Wheel: Allows for real-time pitch modulation of notes.
- Dabarun Modulation: Provides real-time control over various assignable parameters, typically vibrato or other effects.
- Maɓallin Wuta: Yana kunna ko kashe naúrar.
- Sustain Button: Toggles sustain on/off, mimicking a sustain pedal.
- Octave Up/Down Buttons: Shifts the keyboard's octave range up or down.
- Data Entry Slider: Used for adjusting parameter values shown on the display.
- MIDI/Select Button: Used to enter MIDI configuration mode or select options.
- Program Up/Down Buttons: Navigates through different program or preset numbers.
- 8 Real-Time Controller Knobs (1-8): Assignable rotary encoders for controlling various MIDI parameters.
- 9 Real-Time Controller Sliders (9-17): Assignable faders for controlling various MIDI parameters.
- Nuni na LED: Shows current parameter values, program numbers, and other status information.

Figure 4.2: Detail of the left-side controls, including Pitch Bend, Modulation, Power, Sustain, Octave Up/Down, Data Entry slider, and LED display.
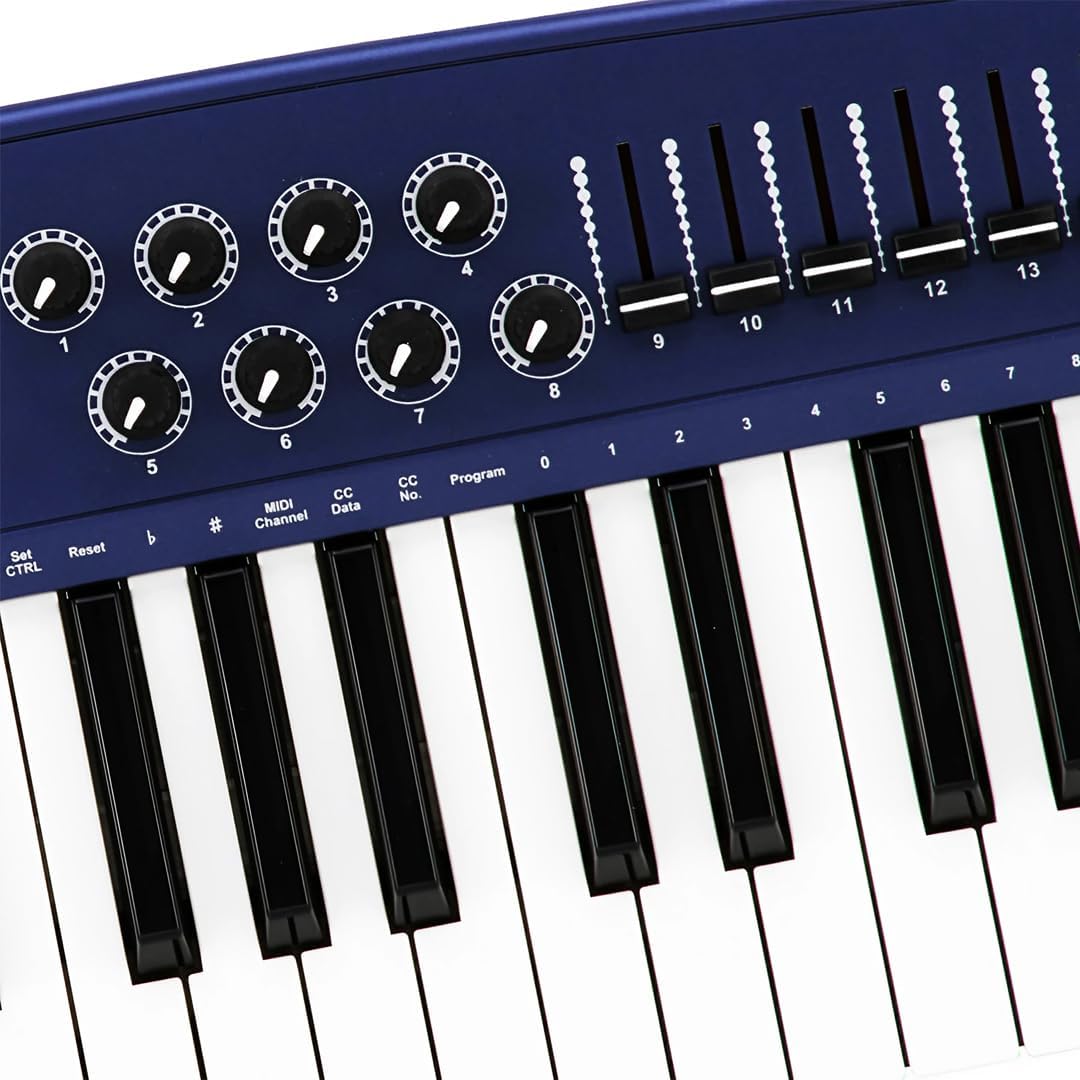
Figure 4.3: Detail of the right-side controls, showing the 8 rotary knobs and 9 faders, along with key labels for MIDI configuration.
4.2 Haɗin Ƙungiyar Rear
- Sustain Switch Input: 1/4-inch jack for connecting an external sustain pedal (not included).
- KEYBOARD MIDI OUT (5-pin DIN): Standard MIDI output for connecting to other MIDI devices.
- Tashar USB: For connecting to a computer (PC/Mac) for MIDI communication and power.
- Canjin Wuta: Babban maɓallin wuta don naúrar.

Figure 4.4: Rear panel showing the Sustain Switch input, KEYBOARD MIDI OUT, USB port, and Power switch.
5. Saita
5.1 Haɗawa da Kwamfuta (USB)
- Tabbatar cewa an kunna kwamfutarka.
- Connect one end of the supplied USB cable to the USB port on the rear panel of the Origin 37.
- Haɗa dayan ƙarshen kebul na USB zuwa tashar USB da ke samuwa akan kwamfutarka.
- The Origin 37 is USB class-compliant and does not require special drivers for most operating systems (PC/Mac). It will be powered via the USB connection.
- Turn on the Origin 37 using the Power button on the front panel.
- Your computer should automatically recognize the device. You can then select it as a MIDI input device in your Digital Audio Workstation (DAW) or music software (e.g., Ableton Live).
5.2 Connecting to External MIDI Devices (MIDI OUT)
- Ensure both the Origin 37 and the external MIDI device are powered off.
- Connect a standard 5-pin MIDI cable from the "KEYBOARD MIDI OUT" port on the Origin 37 to the MIDI IN port of your external MIDI device (e.g., synthesizer, sound module).
- Power on the Origin 37, then power on your external MIDI device.
- Configure your external MIDI device to receive MIDI data on the appropriate MIDI channel.
5.3 Connecting a Sustain Pedal
- Connect a standard 1/4-inch TS (mono) sustain pedal (not included) to the "Sustain Switch" input on the rear panel.
- The pedal will function as a sustain control for your MIDI notes.
6. Umarnin Aiki
6.1 Basic Aiki
- Maɓallan Wasa: Simply press the keys to send MIDI note-on/note-off messages to your connected software or hardware. The keys are velocity-sensitive, meaning the harder you press, the higher the velocity value sent.
- Farar Bend Wheel: Move the wheel up or down to bend the pitch of currently held notes. It automatically returns to the center position.
- Dabarun Modulation: Move the wheel to apply modulation effects. This wheel typically stays in the position you leave it. The specific effect controlled depends on your software or hardware instrument's settings.
- Sustain Button: Press to toggle sustain on or off. When active, notes will continue to sound after the key is released, similar to a piano's sustain pedal.
- Octave Up/Down: Use these buttons to transpose the entire keyboard up or down in octave increments. The LED display will indicate the current octave shift.
- Program Up/Down: These buttons are used to send MIDI Program Change messages, allowing you to switch between different sounds or presets on your connected MIDI device or software.
6.2 Assigning Knobs and Sliders
The 8 knobs and 9 sliders are assignable MIDI controllers. They send MIDI Control Change (CC) messages. The specific CC number each knob/slider sends can be configured. Refer to your software's or hardware's manual for how to map these CC messages to parameters.
To assign a knob or slider:
- Danna maɓallin MIDI/Select button to enter configuration mode.
- Yi amfani da Shigar da bayanai slider or Octave Up/Down buttons to navigate through parameters on the LED display.
- Select the desired knob or slider to assign.
- Adjust the value (e.g., MIDI CC number) using the Shigar da bayanai darjewa.
- Latsa MIDI/Select again to exit configuration mode and save changes.
Note: Specific assignment procedures may vary. Consult the detailed MIDI implementation chart (if available) or your DAW's manual for advanced mapping.
6.3 Data Entry and Display
The LED display provides visual feedback for various settings and parameters. The Shigar da bayanai slider is primarily used to adjust numerical values shown on this display, such as MIDI channel, CC numbers, or program numbers during configuration.
7. Kulawa
- Tsaftacewa: Use a soft, dry cloth to clean the surface of the unit. Do not use abrasive cleaners, waxes, or solvents.
- Ajiya: Idan ba a amfani da na'urar na tsawon lokaci, a ajiye na'urar a wuri mai sanyi da bushewa, nesa da hasken rana kai tsaye da kuma yanayin zafi mai tsanani.
- Gudanarwa: A guji jefar da na'urar ko kuma haifar da mummunan tasiri a gare ta.
- Ƙarfi: Always disconnect the USB cable when the unit is not in use or during electrical storms.
8. Shirya matsala
| Matsala | Dalili mai yiwuwa | Magani |
|---|---|---|
| Babu wuta/ naúrar da baya kunnawa. | Kebul na USB ba a haɗa shi ko kuma yana da matsala. | Ensure USB cable is securely connected to both the controller and a powered USB port. Try a different USB port or cable. |
| No sound from software/hardware. | MIDI input not selected in software; incorrect MIDI channel; software instrument not loaded. | Verify the Origin 37 is selected as a MIDI input device in your DAW. Check that the MIDI channel on the controller matches the receiving channel of your software/hardware. Ensure a sound-generating instrument is loaded and active. |
| Knobs/Sliders do not control parameters. | Not mapped in software; incorrect MIDI CC assignment. | Ensure the knobs/sliders are correctly mapped to parameters within your DAW or software instrument. Check the MIDI CC numbers being sent by the controller and ensure they match the expected input. |
| Keys are not responding or sending incorrect notes. | Connection issue; software conflict. | Reconnect the USB cable. Restart your computer and DAW. Check for any conflicting MIDI drivers or software. |
| LED display flickering or unstable. | Canjin wutar lantarki; matsalar ciki. | Ensure a stable USB power source. Try connecting to a different USB port or a powered USB hub. If the issue persists, contact customer support. |
9. Ƙayyadaddun bayanai
| Siffar | Daki-daki |
|---|---|
| Maɓallai | 37 full-size, velocity-sensitive keys |
| Masu sarrafawa | Pitch Bend Wheel, Modulation Wheel, 8 Assignable Knobs, 9 Assignable Sliders, Sustain Button, Octave Up/Down, Program Up/Down, Data Entry Slider |
| Nunawa | LED nuni |
| Haɗin kai | USB (Type B), 5-pin MIDI OUT, 1/4" Sustain Switch Input |
| Tushen wutan lantarki | Kebul na Bus Power |
| Daidaituwa | PC, Mac (USB Class Compliant) |
| Girma (L x W x H) | 27.56 x 10.24 x 4.13 inci (70 x 26 x 10.5 cm) |
| Nauyi | 6.39 fam (2.9 kg) |
10. Garanti da Tallafawa
10.1 Bayanin Garanti
Midiplus products are designed and manufactured to the highest quality standards. For specific warranty terms and conditions, please refer to the warranty card included with your product or visit the official Midiplus website. Ajiye rasidin siyan ku azaman shaidar siyan don da'awar garanti.
10.2 Tallafin Abokin Ciniki
If you encounter any issues or have questions not covered in this manual, please contact Midiplus customer support. You can typically find contact information on the official Midiplus website ko ta hanyar dillalin ku.
Don ƙarin taimako, zaku iya ziyartar shafin Midiplus Store on Amazon.
Ask a question about this manual
Ask about setup, troubleshooting, compatibility, parts, safety, or missing instructions. Manuals+ will review the question and use this page’s manual context to help answer it.