
Gabatarwa
This manual provides detailed instructions for the installation, operation, and maintenance of your Venstar T1900 Residential Slimline Platinum Thermostat. Please read this manual thoroughly before attempting to install or operate the thermostat to ensure proper function and to avoid potential damage.
Muhimman Bayanan Tsaro
- Always turn off power to the heating/cooling system at the main circuit breaker or fuse box before installing or servicing the thermostat.
- This thermostat operates on 24 Volts AC. Do not connect to line voltage (120V ko 240V).
- Installation should be performed by a qualified technician if you are unfamiliar with electrical wiring.
- Do not short circuit the terminals on the gas valve or at the system control to test the thermostat. This will damage the thermostat and void the warranty.
- Ensure all wiring connections are secure and insulated to prevent short circuits.
Abubuwan Kunshin
Tabbatar cewa kunshin ku ya ƙunshi abubuwa masu zuwa:
- Venstar T1900 Thermostat Unit
- Hardware na hawa (skru da anka bango)
- Jagorar mai amfani (wannan takaddar)
Samfurin Ƙarsheview
The Venstar T1900 is a 7-day programmable digital thermostat designed for residential use. It offers precise temperature control and energy-saving scheduling capabilities. This thermostat is compatible with heat/cool, heat pump, and dual-fuel systems, controlling up to three heat stages da biyu sanyi stage.
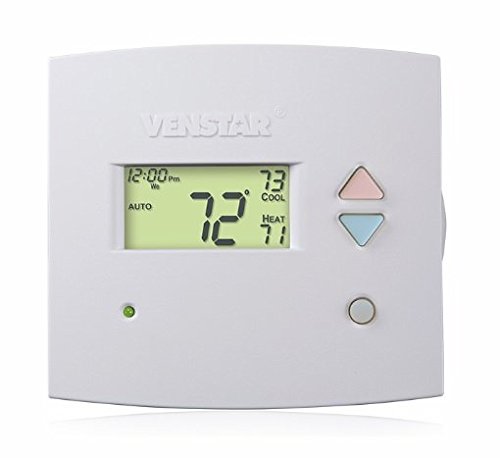
Hoto na 1: Gaba view of the Venstar T1900 Thermostat. This image displays the thermostat's LCD screen and control buttons, indicating its slimline design.
Mabuɗin fasali:
- 7-Day Programmability: Allows for customized heating and cooling schedules for each day of the week.
- Daidaituwar Tsari: Works with heat/cool, dual-fuel, and heat pump systems.
- Multi-Stage Sarrafawa: Manages up to three heat stages da biyu sanyi stage.
- Ikon Ikon nesa: Controllable by phone using an optional add-on (sold separately).
- Automatic or Manual Operation: Provides flexibility for scheduled or on-demand temperature adjustments.
Jagoran Shigarwa
Kayayyakin da ake buƙata:
- Screwdriver (Phillips and/or flathead)
- Drill with appropriate drill bit (if installing new wall anchors)
- Masu yankan waya
- Fensir
- Mataki (na zaɓi)
1. Kashe Wuta
Locate the circuit breaker or fuse box that controls your heating and cooling system. Turn off the power completely before proceeding with any wiring.
2. Remove Old Thermostat (if applicable)
- A hankali cire murfin tsohon ma'aunin zafi naka.
- Ɗauki hoton hanyoyin haɗin waya da ake da su don yin tunani.
- Label each wire with the terminal designation it was connected to (e.g., R, G, Y, W).
- Cire wayoyin kuma cire tsohon farantin ma'aunin zafi daga bango.
3. Dutsen Sabon Thermostat Base
- Separate the front cover of the T1900 thermostat from its base plate.
- Position the base plate on the wall where you want to install the thermostat. Ensure it is level.
- Alama ramukan hawa da fensir.
- Drill pilot holes if necessary and insert wall anchors.
- Secure the thermostat base plate to the wall using the provided screws.
4. Wayoyi
Connect the wires from your HVAC system to the corresponding terminals on the T1900 thermostat base. Refer to the wiring diagram provided with your specific HVAC system for precise connections. Ensure wires are stripped approximately 3/8 inch and securely fastened under the terminal screws.
Na'urorin Tasha gama gari:
- R/Rc/Rh: 24V Power (Heating/Cooling)
- C: Common (24V return)
- G: Masoyi
- Y/Y1: Kwamfuta Stage 1 (Sanyi)
- Y2: Kwamfuta Stage 2 (Sanyi)
- W/W1: Zafi S.tage 1 (Dumama)
- W2: Zafi S.tage 2 (Dumama)
- O / B: Reversing Valve (Heat Pumps)
Note: The T1900 supports various system types. Consult the detailed wiring diagrams in the full installation manual for specific configurations (e.g., heat pump with auxiliary heat, conventional multi-stage tsarin).
5. Haɗa Thermostat zuwa Base
Once wiring is complete and verified, carefully align the thermostat front cover with the mounted base plate and snap it into place.
6. Mayar da Iko
Return to your circuit breaker or fuse box and restore power to your heating and cooling system.
Saita Farko
Upon initial power-up, the thermostat may prompt you to configure basic settings. Follow the on-screen instructions to set the current date, time, and system type (e.g., Conventional, Heat Pump).
System Type Configuration:
It is crucial to correctly configure the thermostat for your specific HVAC system. Incorrect settings can lead to improper operation or damage. Access the installer settings menu (refer to the full installation guide for specific button sequences) to select:
- Nau'in Tsari: Heat/Cool, Heat Pump, Dual Fuel
- Adadin Heat Stages
- Adadin Cool Stages
- Reversing Valve Operation: O (Cooling) or B (Heating)
Umarnin Aiki
Fahimtar Nuni:
The LCD screen displays the current temperature, set temperature, system mode, fan mode, time, and programming status. Refer to the icons and indicators on the screen for current operational status.
Setting System Mode:
Danna maɓallin MODE button to cycle through available system modes:
- ZAFI: The system will operate to maintain the heating setpoint.
- Sanyi: The system will operate to maintain the cooling setpoint.
- Auto: The thermostat automatically switches between heating and cooling as needed to maintain the set temperature range.
- KASHE: Ana kashe tsarin dumama da sanyaya.
Setting Fan Mode:
Danna maɓallin FAN button to cycle through fan modes:
- Auto: Fanka tana aiki ne kawai lokacin da tsarin dumama ko sanyaya yake aiki.
- A: Fanka tana aiki akai-akai, ba tare da la'akari da kiran dumama ko sanyaya ba.
Daidaita Zazzabi:
Yi amfani da UP kuma KASA arrow buttons to adjust the desired temperature setpoint. In programmable modes, this will temporarily override the schedule until the next scheduled change.
Programming Schedules (7-Day):
The T1900 allows for 7-day programming, enabling different schedules for each day of the week. This feature helps save energy by adjusting temperatures when you are away or asleep.
- Danna maɓallin SHIRIN maballin don shigar da yanayin shirye-shirye.
- Yi amfani da RANA button to select the day or group of days you wish to program (e.g., Mon-Fri, Sat-Sun, or individual days).
- Yi amfani da LOKACI button to cycle through the four available periods: Wake, Leave, Return, Sleep.
- Yi amfani da UP kuma KASA arrow buttons to set the desired temperature for each period.
- Yi amfani da RIKE button to exit programming mode or save changes.
Refer to the detailed programming section in the full user guide for advanced options and specific button sequences.
Remote Control (Optional Add-on):
The Venstar T1900 thermostat can be controlled remotely via a phone using an optional add-on module (sold separately). This module connects to the thermostat and allows for remote access and control through a dedicated application. Installation and setup instructions for the remote control module are provided with the module itself.
Kulawa
Cleaning the Thermostat:
To maintain the appearance and functionality of your thermostat, periodically wipe the exterior with a soft, damp cloth. Do not use abrasive cleaners, solvents, or chemical sprays, as these can damage the plastic and electronic components.
Madadin Baturi:
The Venstar T1900 thermostat does not require batteries for operation as it is powered by the 24V AC system.
Shirya matsala
If you experience issues with your Venstar T1900 thermostat, consult the following common problems and solutions:
| Matsala | Dalili mai yiwuwa | Magani |
|---|---|---|
| Nunin thermostat babu komai | Babu wutar lantarki ga thermostat. | Check the circuit breaker for your HVAC system. Ensure all wiring connections are secure. |
| Heating/Cooling system does not respond | Incorrect system mode selected; wiring issue; system lockout. | Verify the system mode (HEAT/COOL/AUTO). Check wiring connections. Wait 5 minutes for system lockout to reset. |
| Karatun zafin jiki yayi kama da ba daidai ba | Thermostat location; sensor obstruction. | Ensure the thermostat is not exposed to direct sunlight, drafts, or heat sources. Clean any dust from the thermostat vents. |
| Programming schedule is not working | Program not saved; temporary override active; incorrect time/day setting. | Ensure programs are saved. Check if a temporary override is active and cancel it. Verify current time and day settings. |
| Fan runs continuously in AUTO mode | Fan mode set to ON; wiring issue. | Press the FAN button to ensure it is set to AUTO. Check fan wiring. |
If these solutions do not resolve the issue, please contact customer support or a qualified HVAC technician.
Ƙayyadaddun bayanai
| Siffar | Ƙayyadaddun bayanai |
|---|---|
| Alamar | Venstar |
| Sunan Samfura | Farashin T1900 |
| Nau'in Mai Gudanarwa | Danna Maballin |
| Siffa ta Musamman | Mai shirye-shirye |
| Launi | Fari |
| Takamaiman Amfani Don Samfura | Heat Pump, Heater |
| Nau'in Kula da Zazzabi | Programmable, Smart/Remote (with add-on) |
| Voltage | 24V AC |
| Nau'in Nuni | LCD ko LED |
| Hanyar sarrafawa | Remote (with add-on) |
| Hasken baya | Ee |
| Girman samfur | 5.3 x 2 x 2 inci |
| Nauyin Abu | 0.01 oz |
| Ana Bukata Batura? | A'a |
Bayanin Garanti
Venstar products are manufactured to high-quality standards. This product is covered by a limited warranty against defects in materials and workmanship. The specific terms and duration of the warranty may vary. Please refer to the warranty card included with your product or visit the official Venstar webshafin don cikakkun bayanan garanti da hanyoyin rajista.
Tallafin Abokin Ciniki
For technical assistance, troubleshooting, or warranty inquiries, please contact Venstar customer support. You can typically find contact information, including phone numbers and email addresses, on the official Venstar webshafin (www.venstar.com) or on the product packaging.
When contacting support, please have your thermostat model number (T1900) and any relevant purchase information ready.