
1. Samfurin Ya Ƙareview
The GeoVision GV-EFD4700-0F is an indoor, fixed, mini-sized network camera designed for day and night surveillance. It features an automatic IR-cut filter and integrated IR LEDs to ensure clear imaging in various lighting conditions. This model offers an entry-level surveillance solution with essential features and high image quality.
Babban fasali sun haɗa da:
- 1/3" progressive scan super low lux CMOS sensor for minimal illumination at 0.02 lux.
- Dual streams supporting H.265, H.264, and MJPEG codecs.
- Video resolutions up to 20 fps at 2592 x 1520, 25 fps at 2560 x 1440, and 30 fps at 2048 x 1520.
- Intelligent IR with a distance of up to 15 meters (50 ft).
- Wide Dynamic Range Pro (WDR Pro) for clear images in high-contrast scenes.
- 3D noise reduction for improved image clarity.
- Built-in microphone for audio monitoring.
- 2-axis mechanism (pan / tilt) for flexible positioning.
- Power options: DC 12V or Power over Ethernet (PoE IEEE 802.3af).
2. Abubuwan Kunshin
Da fatan za a tabbatar cewa duk abubuwa suna nan kuma suna cikin kyakkyawan yanayi yayin buɗe kunshin:
- GeoVision GV-EFD4700-0F Mini Fixed IP Dome Camera
- Kit ɗin Dunƙule
- Samfurin Shigarwa
- Quick Start Guide / Instruction Manual (this document)
3. Bayanin Tsaro
Read these instructions carefully before installation and operation. Keep this manual for future reference.
- Tushen wutar lantarki: Use only the specified power adapter (DC 12V) or a compliant PoE (IEEE 802.3af) switch. Incorrect voltage na iya lalata na'urar.
- Shigarwa: Ensure the camera is securely mounted to prevent it from falling. Installation should be performed by qualified personnel if necessary.
- Muhalli: This camera is designed for indoor use. Do not expose it to water, moisture, or extreme temperatures.
- Tsaftacewa: Cire haɗin wuta kafin tsaftacewa. Yi amfani da laushi, bushe bushe. Kada a yi amfani da masu tsabtace ruwa ko iska.
- Hidima: Kada kayi yunƙurin yiwa wannan samfur sabis da kanka. Koma duk sabis ɗin zuwa ƙwararrun ma'aikatan sabis.
4. Saita da Shigarwa
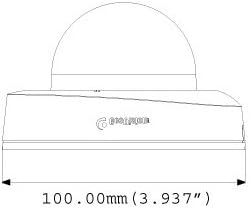
4.1 Girman Jiki
Understand the camera's dimensions for proper placement and mounting.

4.2 Zaɓuɓɓukan hawa
The GV-EFD4700-0F supports both ceiling and wall-surface mounting.


4.3 Matakan Shigarwa
- Zaɓi Wuri: Zaɓi wurin da ya dace a cikin gida don ingantaccen tsarin kula da lafiya.
- Shirya Surface: Use the provided installation template to mark drilling points on the ceiling or wall.
- Ramin Fasa: Drill pilot holes according to the template. Insert wall anchors if necessary.
- Amintaccen Kamara: Attach the camera base to the mounting surface using the supplied screws.
- Haɗa Kebul: Connect the Ethernet cable for network and PoE, or a DC 12V power adapter and a separate Ethernet cable.
- Daidaita kusurwa: Loosen the adjustment screws to pan and tilt the camera lens to the desired viewing angle. Tighten screws once adjusted.
4.4 Kanfigareshan Farko
Bayan shigarwa na zahiri da haɗin wutar lantarki, shiga cikin kyamarar web interface for initial setup:
- Haɗin Yanar Gizo: Ensure the camera is connected to your network. It will typically obtain an IP address via DHCP.
- Gano Kyamara: Use GeoVision's IP Device Utility software or a network scanner to find the camera's IP address.
- Shiga Web Interface: Bude a web browser and enter the camera's IP address.
- Shiga: Enter the default username and password (refer to the Quick Start Guide or GeoVision documentation for default credentials). Change these immediately for security.
- Saitunan asali: Configure network settings, date/time, video resolution, and recording preferences.
5. Aiki da Kamara
5.1 Rayuwa View da Rikodi
Once configured, you can access the live video feed through the web interface or compatible NVR/VMS software. The camera supports continuous recording, scheduled recording, and event-triggered recording (e.g., motion detection).
- Matsi na H.265: Utilizes H.265 video codec for efficient storage and reduced network bandwidth while maintaining high image quality.
- WDR Pro: Wide Dynamic Range Pro enhances image visibility in scenes with both very bright and very dark areas.
- IR Functionality: The built-in IR LEDs automatically activate in low-light conditions, providing clear black and white images up to 15 meters.
5.2 Gano Motsi da Faɗakarwa
Configure motion detection zones and sensitivity within the camera's web interface. The camera can be set to trigger recordings, send email alerts, or notify your VMS upon detecting motion.
5.3 Kula da Sauti
The integrated microphone allows for audio monitoring of the surveillance area. Audio settings can be adjusted via the web dubawa.
6. Kulawa
6.1 Tsaftacewa
Regularly clean the camera lens and housing to ensure optimal image quality. Use a soft, lint-free cloth. For stubborn dirt, a slightly damp Ana iya amfani da zane mai sabulun wanke-wanke mai laushi, sai kuma busasshen zane. A guji masu tsaftace goge-goge ko masu narkewa.
6.2 Sabunta Firmware
Periodically check the GeoVision website for firmware updates. Firmware updates can provide new features, performance improvements, and security enhancements. Follow the instructions provided with the firmware update package carefully to avoid damaging the device.
7. Shirya matsala
If you encounter issues with your GV-EFD4700-0F camera, refer to the following common problems and solutions:
- Babu Ƙarfi:
- Check if the power adapter is securely connected and providing 12V DC.
- If using PoE, ensure the Ethernet cable is connected to a PoE-enabled switch or injector and that the switch port is active.
- Babu Ciyarwar Bidiyo:
- Verify network connectivity. Ping the camera's IP address.
- Ensure the camera's IP address, subnet mask, and gateway settings are correct.
- Check if the video stream settings (e.g., resolution, frame rate) are compatible with your viewing software or NVR.
- Restart the camera by disconnecting and reconnecting power.
- Rashin ingancin Hoto:
- Tsaftace ruwan tabarau na kamara.
- Duba ko akwai cikas a fannin kyamarar view.
- Adjust WDR Pro settings in the web interface for high-contrast scenes.
- Ensure sufficient lighting for optimal color images; IR will provide black and white in low light.
- Ba za a iya shiga ba Web Interface:
- Confirm the camera's IP address is correct.
- Ensure your computer is on the same network segment as the camera.
- Gwada wani daban web mai bincike.
- Temporarily disable any firewall software on your computer.
If problems persist, contact GeoVision technical support.
8. Ƙayyadaddun bayanai
| Siffar | Daki-daki |
|---|---|
| Sunan Samfura | GV-EFD4700-0F |
| Sensor Hoto | 1/3" progressive scan super low lux CMOS |
| Ingancin Har yanzu Ƙaddamarwa | 4 MP |
| Mafi ƙarancin Haske | 0.02 lux |
| Matsi na Bidiyo | H.265, H.264, MJPEG |
| Max. Ƙimar Tsarin | 30 fps at 2048 x 1520 |
| Distance IR | Har zuwa 15 m (50 ft) |
| Lens | 2.8mm (Fixed) |
| Rage Rage | WDR Pro |
| Rage Hayaniya | Rage Hayaniyar 3D |
| Audio | Makirifo na ciki |
| Pan/Tilt Mechanism | 2-axis |
| Shigar da Wuta | DC 12V / PoE (IEEE 802.3af) |
| Fasahar Haɗuwa | Wired (Ethernet), Wi-Fi (for certain functions/protocols) |
| Amfanin Cikin Gida/Waje | Cikin gida |
| Girma (Abu) | 3.9 x 3.9 x 2.4 inci (100 x 100 x 60.8 mm) |
| Nauyi (Abu) | 5.28 oz |
| Launi | Fari |
| Mai ƙira | USA Vision Systems |
9. Garanti Bayani
GeoVision products typically come with a limited manufacturer's warranty. Specific warranty terms, conditions, and duration may vary by region and retailer. Please refer to the warranty card included with your purchase or visit the official GeoVision website for detailed warranty information and registration procedures. Keep your proof of purchase for warranty claims.
10. Taimako
For technical assistance, product inquiries, or further support, please utilize the following resources:
- GeoVision Official Website: Ziyarci www.geovision.com.tw for product documentation, FAQs, software downloads, and support contact information.
- Goyon bayan sana'a: Contact GeoVision's technical support team through their website or the contact details provided in your product's packaging.
- Albarkatun Kan layi: Explore online forums and communities for user-generated tips and solutions.