1. Gabatarwa
Thank you for choosing the Goshyda Portable Multimedia 1080P Projector. This compact and versatile device is designed to provide a personal cinema experience, supporting various multimedia inputs for entertainment, presentations, and more. Please read this manual carefully before using the projector to ensure proper operation and to maximize its lifespan.

Image 1.1: The Goshyda YG300 Mini Portable Projector in a home entertainment setting.
2. Bayanin Tsaro
- Tushen wutan lantarki: Use only the specified 5V 2A power adapter or a compatible power bank. Incorrect voltage na iya lalata na'urar.
- Samun iska: Kada a toshe hanyoyin samun iska. A tabbatar da isasshen iska a kusa da na'urar hangen nesa domin hana zafi sosai.
- Muhalli: Avoid exposing the projector to water, moisture, dust, or extreme temperatures. Operate in a clean, dry environment.
- Tsaftacewa: Cire haɗin wuta kafin tsaftacewa. Yi amfani da laushi, bushe bushe. Kada a yi amfani da masu tsabtace ruwa ko iska.
- Bazu: Kada ka yi ƙoƙarin wargaza ko gyara na'urar hangen nesa da kanka. Ka miƙa duk wani aiki ga ma'aikata masu ƙwarewa.
- Kariyar ido: Kada a kalli ruwan tabarau kai tsaye lokacin da lamp yana kan.
3. Abubuwan Kunshin
Da fatan za a duba abin da ke cikin kunshin lokacin da aka buɗe akwatin. Idan wani abu ya ɓace ko ya lalace, tuntuɓi dillalin ku.
- Goshyda Portable Projector
- Ikon nesa
- Cable AV
- Adaftar Wuta
- Jagorar mai amfani (wannan takaddar)

Image 3.1: Included accessories with the Goshyda Portable Projector.
4. Samfurin Ya Ƙareview
4.1. Projector Features
- 1080P Resolution Support: Yana ba da cikakkun hotuna dalla-dalla.
- Ƙirƙirar ƙira mai ɗaukuwa: Weighing approximately 290g, it is easy to carry.
- Multi-Port Connectivity: Includes USB, HDMI, AV, memory card slot, and audio output.
- Gina masu magana: Provides integrated audio for convenience.
- Ƙarfin Mai Sauƙi: Can be powered by a 5V 2A wall charger or power bank.

Image 4.1: Visual representation of the projector's main features.
4.2. Projector Ports and Controls
Familiarize yourself with the various ports and controls on your projector.
- Lens: Front-facing projection lens.
- Mayar da hankali: Yana daidaita tsabtar hoto.
- Shigar da Wutar Lantarki (DC IN): Connects to the 5V 2A power adapter.
- HDMI Port: Don haɗa na'urori ta hanyar kebul na HDMI.
- Tashar USB: Don haɗa na'urorin ajiya na USB.
- AV Port: For connecting devices via AV cable.
- Ramin Katin MicroSD: For inserting a memory card.
- Fitowar Sauti: Don haɗa lasifikan waje ko belun kunne.
- Maɓallan sarrafawa: On the top panel for basic navigation and selection.

Hoto 4.2: Gefe view of the projector highlighting its connectivity ports.

Image 4.3: Close-up of the projector lens.
5. Saita
5.1. Haɗin Wuta
- Connect the provided power adapter to the DC IN port on the projector.
- Toshe adaftan wutar cikin madaidaicin tashar lantarki.
- Alternatively, for portable use, connect a 5V 2A power bank to the DC IN port.

Image 5.1: Powering the projector via wall adapter or power bank.
5.2. Sanyawa da Hasashen
Place the projector on a stable, flat surface. The optimal projection distance is between 1 to 2.5 meters, allowing for a screen size of up to 60 inches.
- For a 24-inch screen, place the projector approximately 0.8 meters away.
- For a 47-inch screen, place the projector approximately 1.2 meters away.
- For a 60-inch screen, place the projector approximately 1.6 meters away.
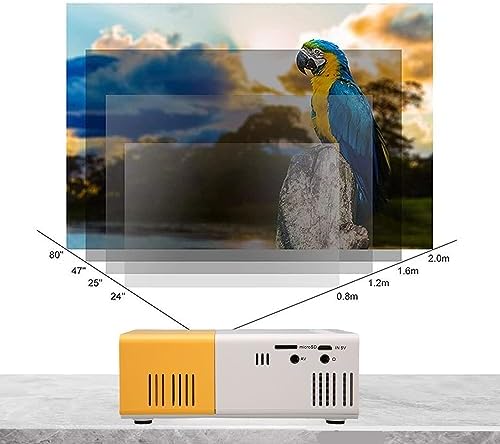
Image 5.2: Projection distance guidelines for various screen sizes. Note: Maximum recommended projection size is 60 inches.
5.3. Mayar da hankali Daidaita
After placing the projector and powering it on, rotate the focus ring located around the lens until the projected image appears clear and sharp.
6. Umarnin Aiki
6.1. Kunnawa / Kashewa
- Kunna Wuta: Danna maɓallin wuta akan majigi ko na'urar ramut.
- Kashe Wuta: Press the power button again. The projector will shut down.
6.2. Zaɓin Tushen shigarwa
Use the 'Source' button on the remote control or the projector's control panel to cycle through available input sources (HDMI, USB, AV, MicroSD).
6.3. Kewayawa Menu
Use the arrow buttons on the remote control or projector to navigate through menus. Press 'OK' or 'Enter' to confirm selections. Use the 'Return' or 'Back' button to go back to the previous menu.
7. Haɗuwa
The projector offers multiple connectivity options for various devices.

Image 7.1: Connectivity options for the Goshyda projector.
7.1. Haɗin HDMI
Connect devices such as laptops, TV Sticks, game consoles (e.g., for Xbox One), or Blu-ray players using an HDMI cable. Select 'HDMI' as the input source.
7.2. Haɗin USB
Saka kebul na filasha a cikin tashar USB don kunna mai jarida files directly. Select 'USB' as the input source and navigate through your files.
7.3. AV Connection
Use the provided AV cable to connect older devices like DVD players. Select 'AV' as the input source.
7.4. Smartphone/Tablet Connection
To connect directly to your smartphone or tablet, you will need an appropriate adapter (e.g., Micro USB to HDMI, Type-C to HDMI, or a dedicated HD multimedia interface device), depending on your device's operating system (OS X or Android) and available ports. These adapters are sold separately.
7.5. Fitar da Sauti
Connect external speakers or headphones to the audio output port for enhanced sound.
8. Kulawa
- Tsaftace Lens: Yi amfani da zane mai laushi, wanda ba shi da lint wanda aka ƙera musamman don ruwan tabarau na gani don goge ruwan tabarau na gani a hankali. Kada a yi amfani da kayan gogewa ko sinadarai masu ƙarfi.
- Tsabtace Waje: Wipe the projector's exterior with a soft, dry cloth.
- Ajiya: When not in use for extended periods, store the projector in a cool, dry place, away from direct sunlight and dust.
9. Shirya matsala
| Matsala | Dalili mai yiwuwa | Magani |
|---|---|---|
| Babu iko | Power adapter not connected or faulty; insufficient power supply. | Ensure the 5V 2A power adapter is securely connected and plugged into a working outlet. Try a different power source or power bank. |
| Babu hoto | Incorrect input source selected; cable not connected properly; device not outputting signal. | Select the correct input source (HDMI, USB, AV). Check all cable connections. Ensure the connected device is powered on and outputting a signal. |
| Hoton ba shi da haske | Ba a daidaita mayar da hankali ba; na'urar haska bayanai ta yi kusa/da nisa da allo. | Rotate the focus ring to sharpen the image. Adjust the projection distance within the recommended range (1-2.5m). |
| Babu sauti | Volume too low or muted; external speakers not connected; audio format not supported. | Increase the volume on the projector and the source device. Check if external speakers are properly connected. Ensure the audio format is supported. |
10. Ƙayyadaddun bayanai
| Siffar | Daki-daki |
|---|---|
| Alamar | Goshida |
| Lambar Samfura | Goshyda89pkbg17g0 |
| Nuni Resolution | 1920 x 1080 (1080P Support) |
| Haske | 200 Lumen |
| Halayen Rabo | 4:3 |
| Nisa Hasashen | Mita 1 - 2.5 |
| Girman Hasashen | Har zuwa 60 inci |
| Fasahar Haɗuwa | HDMI, USB, AV, MicroSD, Audio Out |
| Shigar da Wuta | 5V 2A |
| Nau'in Nuni | LCD |
| Girman samfur | 12L x 8.5W x 4.6H cm (Approx. 4.7 x 3.3 x 1.8 inches) |
| Factor Factor | Mai ɗaukar nauyi |
| Nau'in hawa | Dutsen tebur |
11. Garanti da Tallafawa
For warranty information and customer support, please refer to the documentation provided with your purchase or contact your retailer directly. Keep your proof of purchase for warranty claims.