
Richmat B
Richmat HJH55 Remote and HJC18 Control Box User Manual
Model: B
Gabatarwa
This manual provides instructions for the Richmat HJH55 Remote Control and HJC18 Control Box combination package, designed for adjustable bed bases. This package ensures compatibility between the remote and control box. Please read these instructions carefully before installation and operation to ensure proper functionality and compatibility with your existing adjustable bed system.
It is crucial to verify that the ports and button layout on this new control box and remote match your previous components to ensure proper operation.
Abubuwan Kunshin
- 1 x Richmat HJH55 Remote Control
- 1 x Richmat HJC18 Control Box

Image: The Richmat HJH55 remote control and HJC18 control box, shown together as a complete package.
Saita da Shigarwa
- Tabbatar dacewa: Before installation, carefully compare the ports on the HJC18 Control Box with your existing control box. Ensure all necessary connections (motor cables, power cable) align. Also, confirm the remote control's button layout matches your previous remote if you are replacing an older unit. This product is Model B.
- Kashe Haɗin Wuta: Unplug your adjustable bed base from the main power outlet before proceeding with any installation steps.
- Remove Old Components (if applicable): If replacing an existing control box and remote, carefully disconnect all cables from the old control box. Note the position of each cable for easier installation of the new unit.
- Install New Control Box: Connect the motor cables from your bed base to the corresponding ports on the HJC18 Control Box. The ports are typically color-coded or labeled. Ensure a secure connection for each cable.

Hoto: Kusanci view of the HJC18 control box, showing the various color-coded ports for motor connections and a USB port. The "Reset Coding" button is also visible.
- Haɗa Ikon: Plug the power cable from your bed base into the HJC18 Control Box.
- Saka Batura a cikin Na'urar Nesa: The HJH55 Remote Control requires 2xAA batteries (not included). Open the battery compartment on the back of the remote and insert the batteries, observing the correct polarity (+/-).
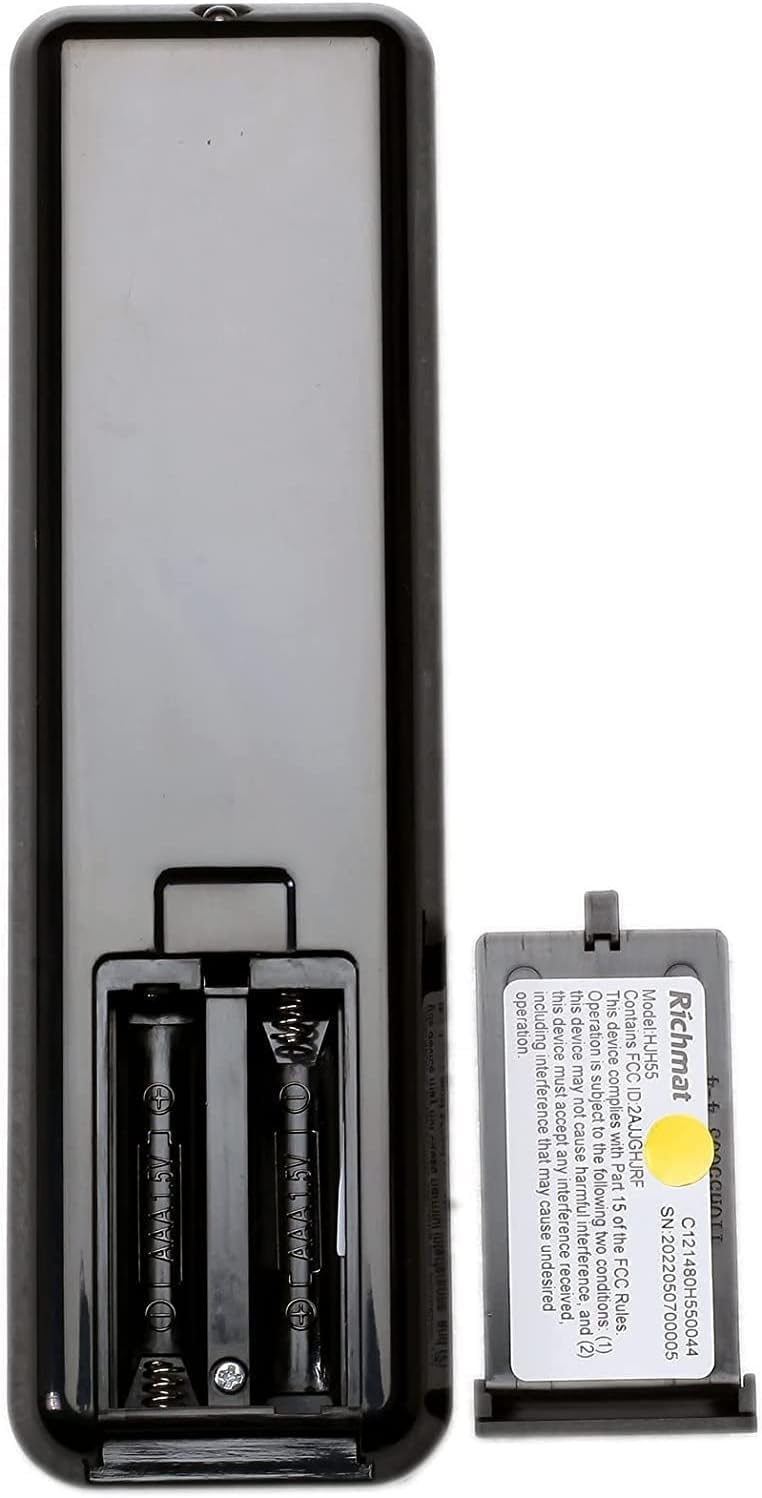
Hoto: Bayan view of the HJH55 remote control, showing the open battery compartment designed for two AA batteries. A Richmat label with model and serial information is also visible.
- Haɗa Ikon Nesa: The remote control and control box are guaranteed to pair with each other, but may not come pre-paired. Follow these steps to pair them:
- Ensure the control box is powered on.
- Locate the "Reset Coding" button on the HJC18 Control Box (refer to image above).
- Press and hold the "Reset Coding" button on the control box for approximately 3-5 seconds until an indicator light on the control box flashes or a sound is heard.
- Within 10 seconds of the indicator flashing, press and hold any button on the HJH55 Remote Control (e.g., the "FLAT" button or "HEAD" up button) until the indicator light on the control box stops flashing or a confirmation sound is heard.
- Test the remote control by pressing various buttons to ensure the bed base responds correctly.
- Haɗin Wuta: Once all connections are secure and pairing is complete, plug the adjustable bed base back into the main power outlet.
Umarnin Aiki
The HJH55 Remote Control provides intuitive control over your adjustable bed base. Familiarize yourself with the button functions:

Hoto: cikakken bayani view of the HJH55 remote control, highlighting key buttons such as "ANTI SNORE", "M3" (memory preset), and "FLAT" with red circles.
- HEAD Up/Down Arrows: Adjusts the head section of the bed up or down.
- FOOT Up/Down Arrows: Adjusts the foot section of the bed up or down.
- FLAT: Yana mayar da gadon zuwa matsayin da babu komai a ciki.
- ANTI SNORE: Activates a pre-programmed position designed to alleviate snoring.
- TV: Moves the bed to a comfortable position for watching TV.
- ZG (Sifili Nauyi): Moves the bed to a zero-gravity position, which can relieve pressure on the back.
- M1, M2, M3: Memory preset buttons. To set a preset, adjust the bed to your desired position, then press and hold the desired memory button (M1, M2, or M3) until the bed slightly moves or a confirmation sound is heard. To recall a preset, simply press the corresponding memory button.
- 10 MIN / 20 MIN: Timer functions, likely for massage or other timed features if supported by your bed base.
- TIMER / ALL OFF: Turns off any active timer or function.
- Light Bulb Icon: Activates an under-bed light or other integrated lighting feature if available.
- kwatance: Cycles through different modes or functions, if applicable.
Kulawa
- Tsaftacewa: Wipe the remote control and control box with a soft, dry cloth. Do not use liquid cleaners or abrasive materials.
- Madadin Baturi: Replace the AA batteries in the remote control when the buttons become unresponsive or the indicator light (if present) dims. Always replace both batteries at the same time.
- Na'urar USB: Ensure all cables connected to the control box are not pinched or tangled, which could lead to damage or malfunction.
- Yanayin Muhalli: Keep the control box and remote away from excessive moisture, heat, and direct sunlight.
Shirya matsala
| Matsala | Dalili mai yiwuwa | Magani |
|---|---|---|
| Ikon nesa baya amsawa. |
|
|
| Bed base motors not moving. |
|
|
| Bed moves in wrong direction or erratically. |
|
|
Ƙayyadaddun bayanai
| Siffar | Daki-daki |
|---|---|
| Samfurin Samfura | B |
| Tsarin Gudanarwa Nesa | Richmat HJH55 |
| Model Akwatin Sarrafa | Richmat HJC18 |
| Input (Control Box) | DC 24V-30V, 8A Max. IP20 |
| Output (Control Box) | DC 24-30V |
| Duty Cycle (Control Box) | 10%, Max. 2min ON/18min OFF |
| Nau'in Baturi Mai Nisa | 2 x AA baturi (ba a haɗa su ba) |
| Fasahar Haɗuwa | Infrared |
| Na'urori masu jituwa | Daidaitacce Tushin Kwanciya |
| Mai ƙira | Richmat |
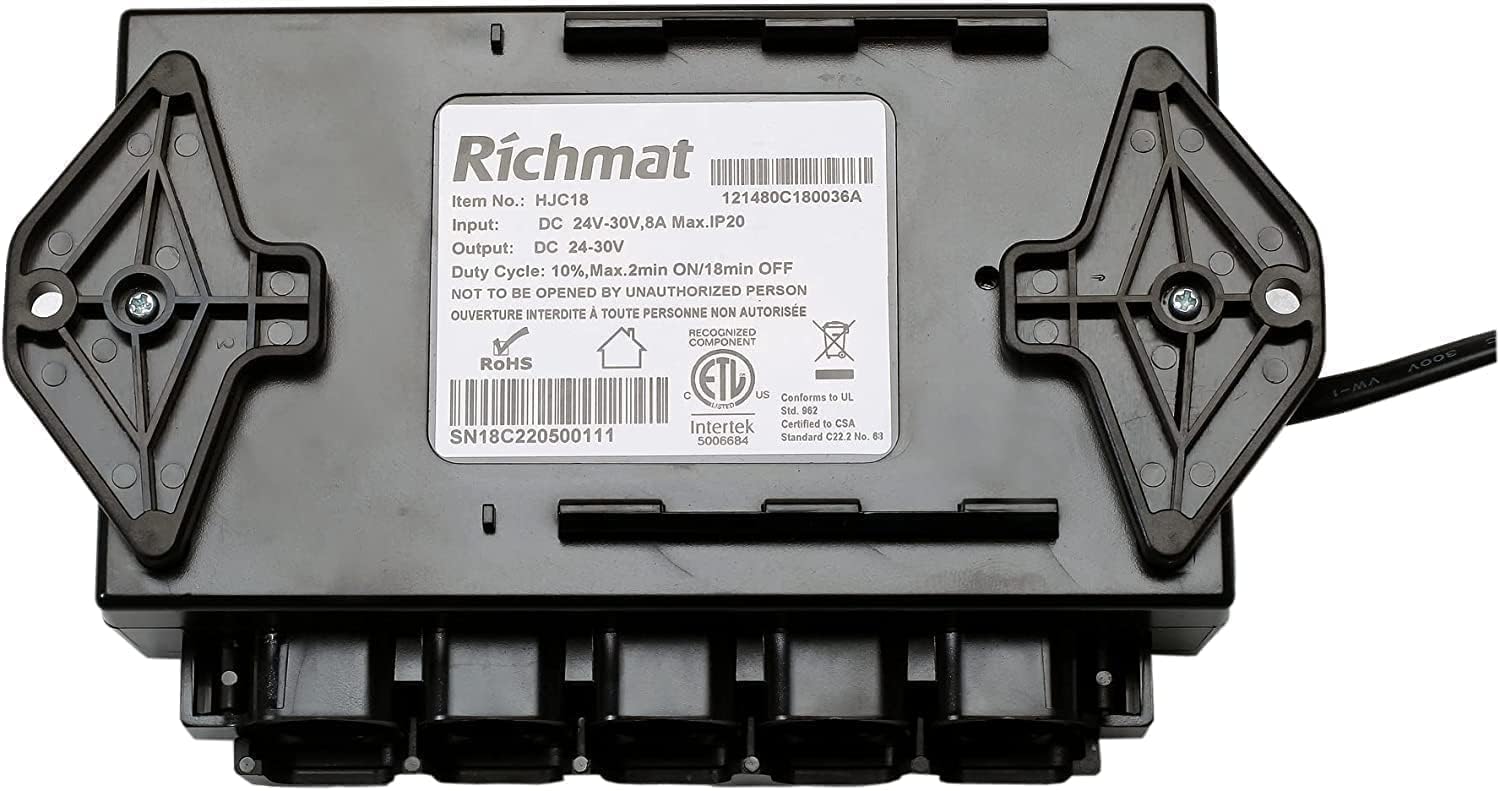
Image: The underside of the HJC18 control box, displaying the Richmat product label with detailed specifications including item number, input/output voltage, current, duty cycle, and certifications.
Garanti da Taimako
For assistance with setup, troubleshooting, or general inquiries regarding your Richmat HJH55 Remote and HJC18 Control Box, please contact the seller or manufacturer directly. Refer to your purchase documentation for specific warranty details.
Ana ba da shawarar ku riƙe shaidar siyan ku don da'awar garanti.
Ask a question about this manual
Ask about setup, troubleshooting, compatibility, parts, safety, or missing instructions. Manuals+ will review the question and use this page’s manual context to help answer it.