GardenJoy FH-6198S
GardenJoy 21V Cordless Power Drill Set User Manual
Model: FH-6198S
1. Gabatarwa
Thank you for choosing the GardenJoy 21V Cordless Power Drill Set. This versatile tool is designed to assist you with a wide range of home improvement and DIY projects, offering powerful performance and user-friendly features. With its 21V motor, 24+1 torque settings, and 2 variable speeds, it provides precise control for drilling into various materials like wood, metal, and plastic, as well as efficient screw driving. The lightweight and compact design, along with a comfortable soft rubber handle, ensures ease of use for all users. This manual contains important information regarding safety, setup, operation, maintenance, and troubleshooting to help you get the most out of your new drill. Please read it carefully before operation and keep it for future reference.
2. Abubuwan Kunshin

Image: Complete GardenJoy 21V Cordless Drill Set with included accessories.
Your GardenJoy 21V Cordless Power Drill Set includes the following items:
- 1 x 21V Drill mara igiyar waya
- 1 x 1.5Ah Lithium-Ion Battery
- 1 x Caja mai sauri
- 5 x HSS Twist Drill Bits
- 3 x Wood Drill Bits
- 9 x Screwdriver Bits
- 1 x Socket Adapter
- 1 x Sanda Tsawo
- 9 x Sosai
- 1 x Shaft mai sassauƙa
- 1 x Gilashin Tsaro
- 1 x Manhajar mai amfani
3. Samfurin Ya Ƙareview

Hoto: Dalla-dalla view of the drill with key components labeled.
Familiarize yourself with the main components of your cordless drill:
- 3/8" Keyless Chuck: Holds drill bits and screwdriver bits securely.
- 24+1 Torque Saituna: Adjustable collar to select the desired torque for various applications.
- 2 Variable Speed Control: Switch on top of the drill to select between low (0-450 RPM) and high (0-1500 RPM) speeds.
- Canjawa Gaba/Baya: Lever near the trigger to change the rotation direction for drilling or screw driving/removal.
- Maɓallin Saurin Sauri: Yana sarrafa saurin aikin haƙan bisa ga matsin lamba da aka yi amfani da shi.
- Hasken LED: Illuminates the work area for better visibility in dark or confined spaces.
- Maɓallin Sakin Fakitin Baturi: Releases the battery from the drill.
- Batirin Li-ion mai ƙarfin 21V: Provides power to the drill.
- Magnetic Function: Located at the back of the drill, allows for temporary storage of screws.
4. Umarnin Tsaro
Koyaushe ku bi ƙa'idodin tsaro na asali lokacin amfani da kayan aikin wutar lantarki don rage haɗarin gobara, girgizar lantarki, da raunin mutum.
- Tsaron Yankin Aiki: Kiyaye yankin aikinku tsabta da haske sosai. Wurare masu duhu ko duhu suna kiran haɗari. Kada a yi amfani da kayan aikin wuta a cikin abubuwan fashewa, kamar a gaban ruwa mai ƙonewa, gas, ko ƙura.
- Tsaron Wutar Lantarki: Avoid body contact with grounded surfaces such as pipes, radiators, ranges, and refrigerators. Do not expose power tools to rain or wet conditions.
- Tsaro na Keɓaɓɓen: Always wear eye protection (safety goggles included). Use hearing protection when operating the tool for extended periods. Dress properly; avoid loose clothing or jewelry that can get caught in moving parts.
- Amfani da Kulawa: Do not force the power tool. Use the correct tool for your application. Ensure the switch is in the off-position before connecting to a power source, picking up, or carrying the tool.
- Amfanin Baturi da Kulawa: Recharge only with the charger specified by the manufacturer. Do not disassemble the battery pack. Do not short-circuit the battery pack.
- Kulawa: Cire batirin daga kayan aikin kafin yin duk wani gyara, canza kayan haɗi, ko adana kayan aikin wutar lantarki.
5. Saita
5.1 Cajin baturi

Image: The 21V Lithium-Ion battery pack.
- Tabbatar da cikakken cajin baturi kafin amfani da farko.
- Haɗa caja mai sauri zuwa wurin fitar da wutar lantarki na yau da kullun.
- Insert the battery into the charger. The indicator light on the charger will show the charging status.
- A full charge typically takes 1-2 hours. Do not overcharge the battery.
- Cire baturin daga caja da zarar an cika caji.
5.2 Installing and Removing Battery
- To install: Align the battery pack with the base of the drill and slide it in until it clicks securely into place.
- To remove: Press the battery pack release button located at the front of the battery, and slide the battery out.
5.3 Shigarwa da Cire Ramin Rage ...
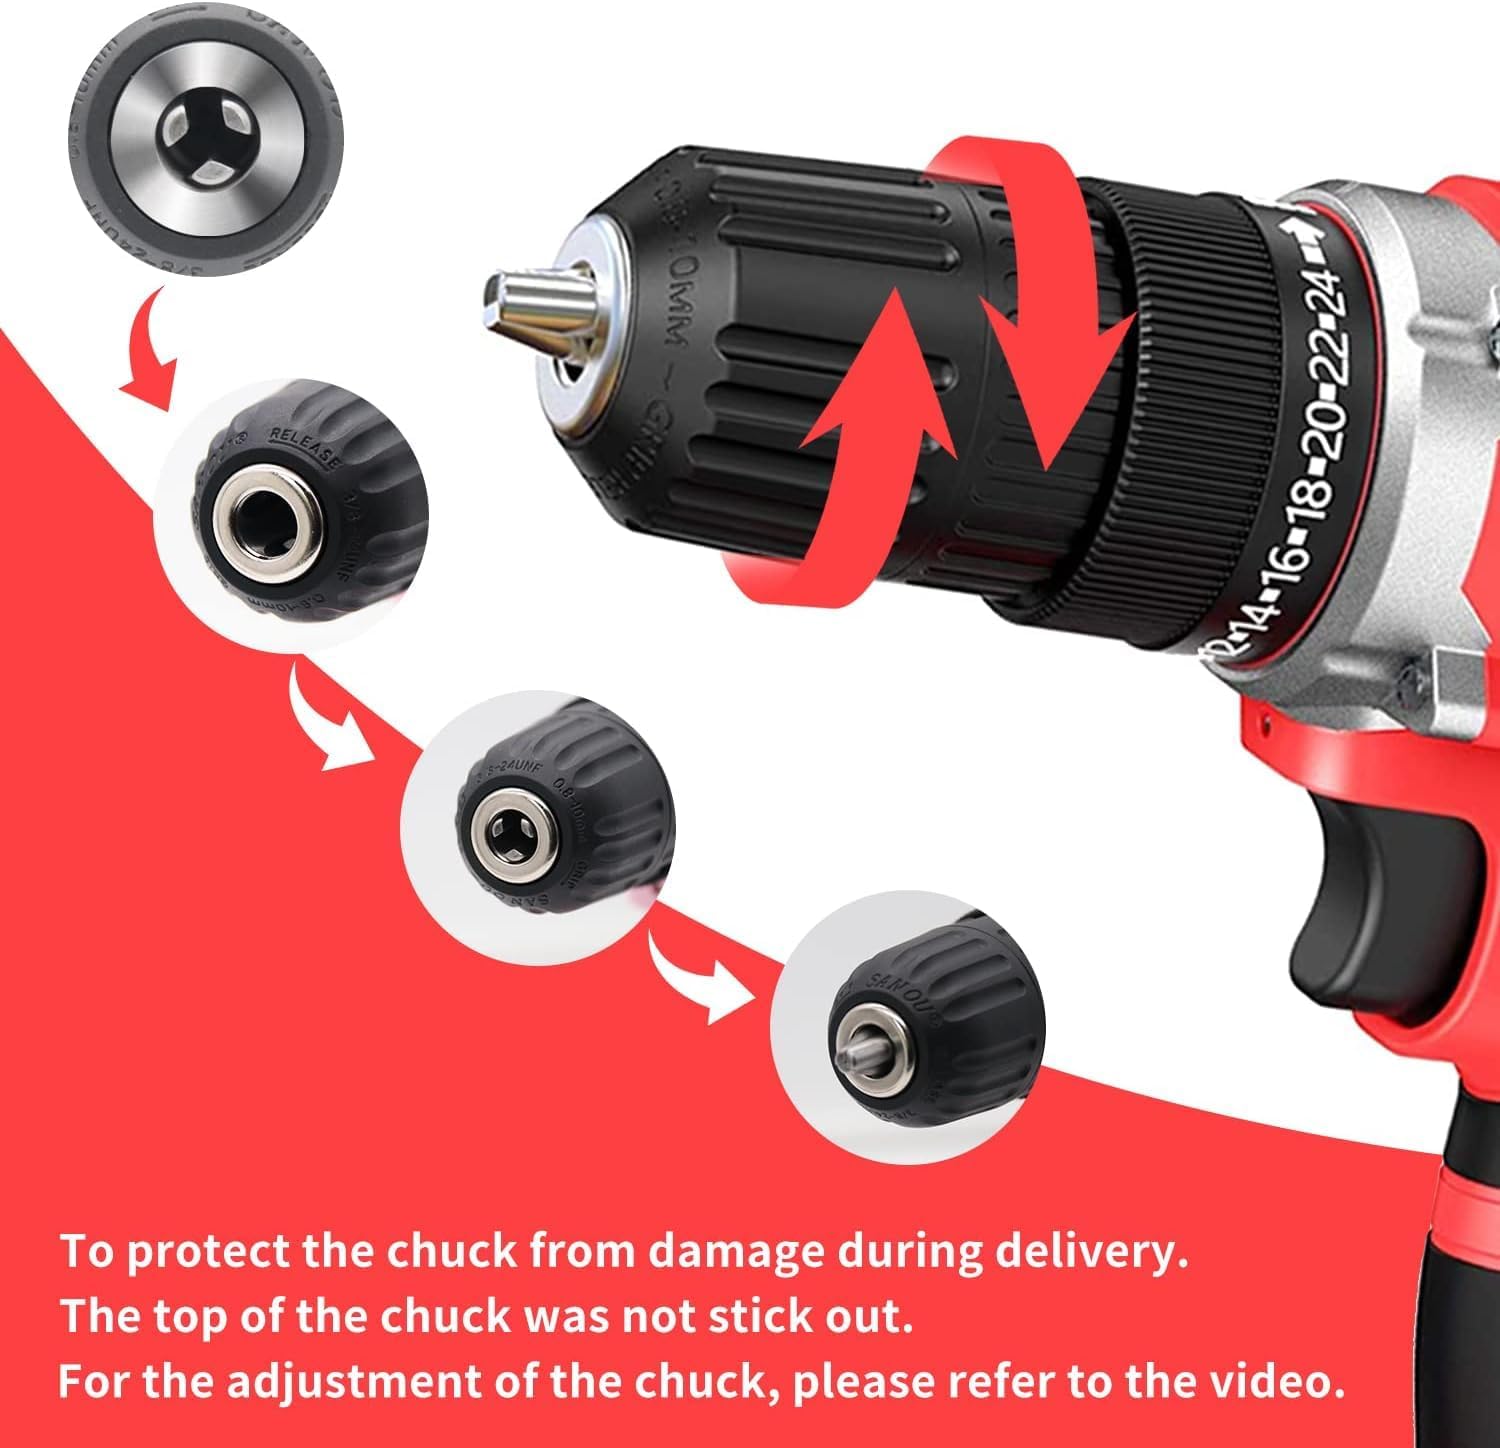
Image: Adjusting the keyless chuck to insert or remove a bit.
- To install: Rotate the chuck counter-clockwise until the jaws are wide enough to insert the bit. Insert the desired drill bit or screwdriver bit fully into the chuck. Rotate the chuck clockwise until the bit is firmly secured.
- Don cirewa: Juya ƙugiya a gefen agogo don sassauta muƙamuƙi kuma cire ɗan bitar.
Video: Demonstrates how to adjust the chuck and install drill bits for the GardenJoy cordless drill.
6. Umarnin Aiki
6.1 Power On/Off and Variable Speed Trigger
- To turn on the drill, press the variable speed trigger. The speed of the drill increases as you apply more pressure to the trigger.
- To turn off, release the trigger.
6.2 Forward/Reverse Switch
- The forward/reverse switch is located above the trigger.
- Push the switch to the left for forward rotation (for drilling and driving screws).
- Danna maɓallin zuwa dama don juyawar baya (don cire sukurori).
- When the switch is in the center position, the trigger is locked, preventing accidental operation.
6.3 Torque Settings (24+1 Position Clutch)
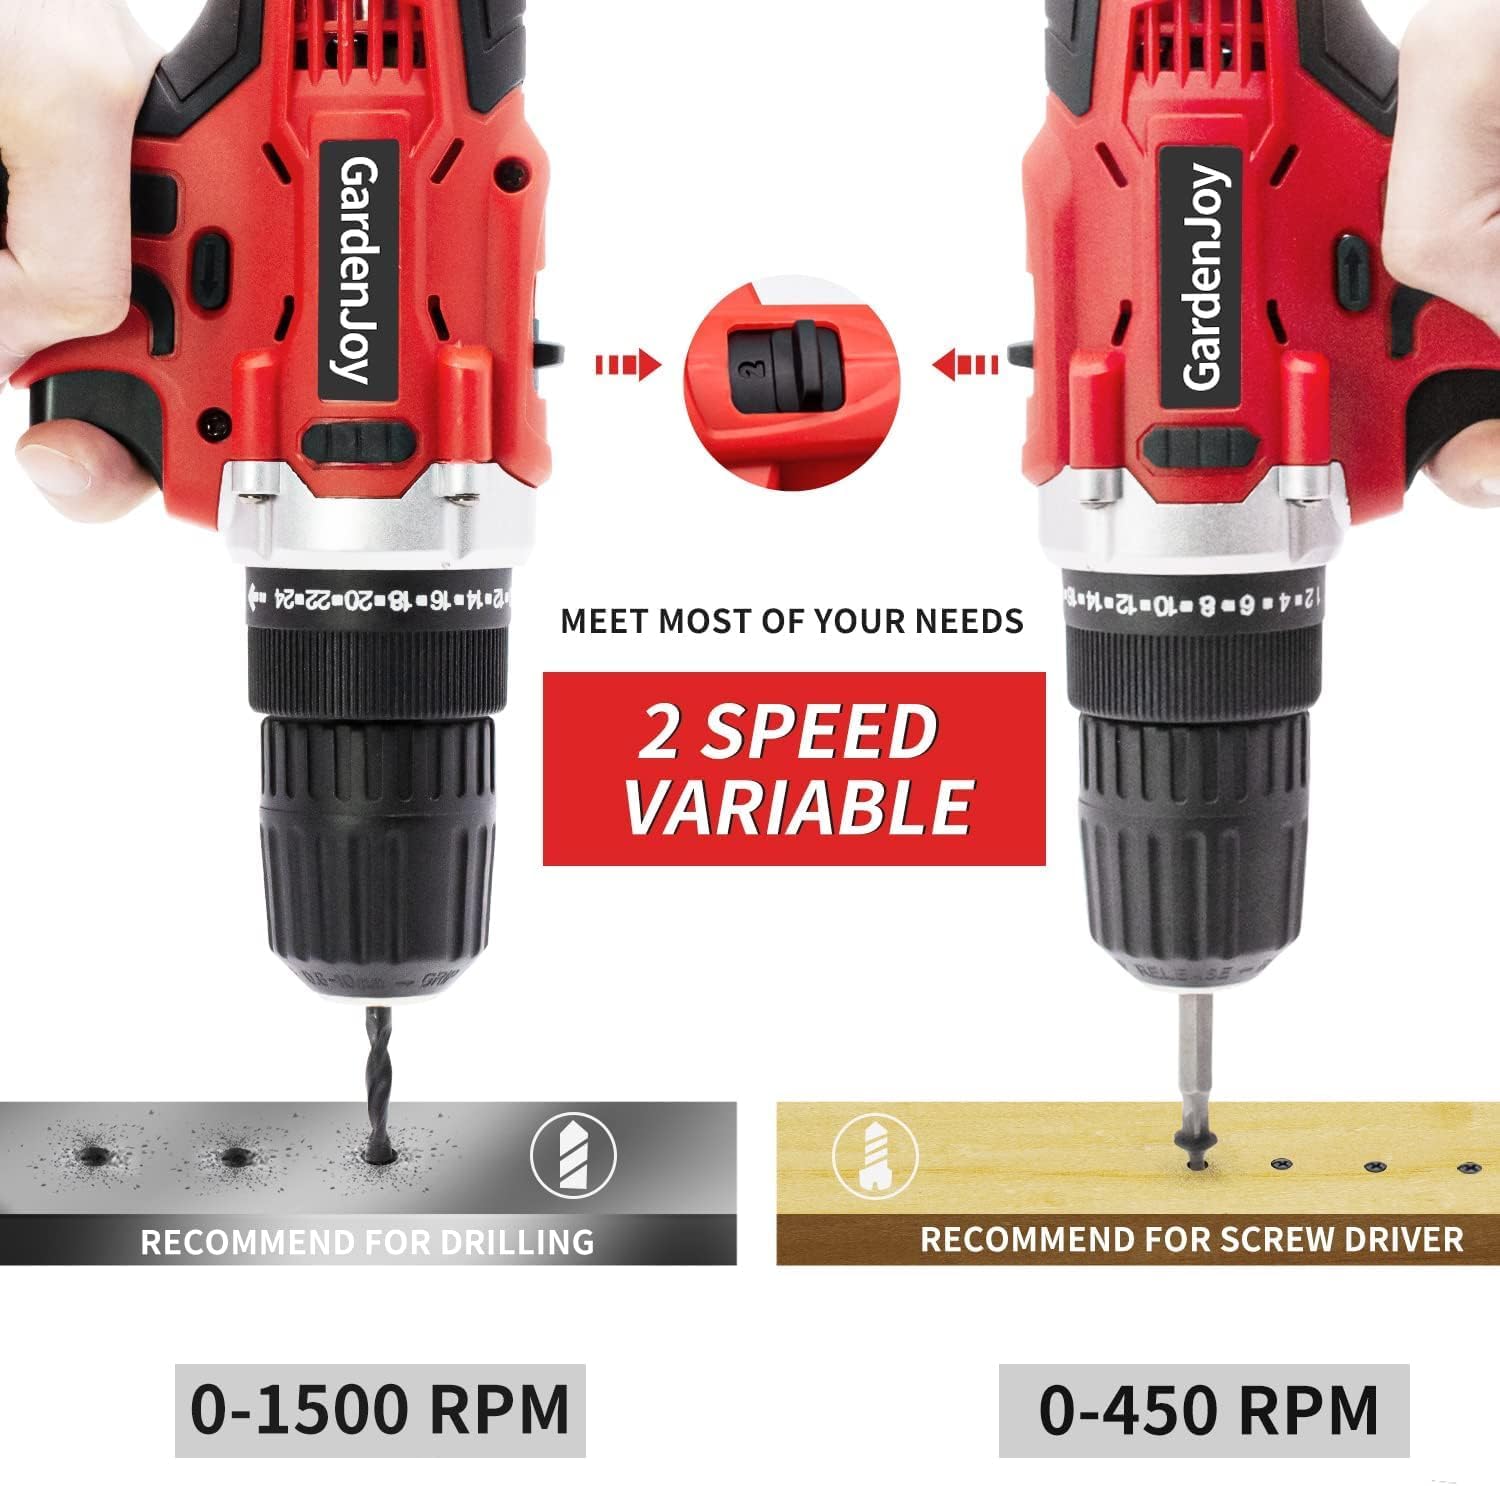
Image: The torque adjustment ring with 24+1 settings.
- The torque adjustment ring allows you to select the amount of torque applied. Settings range from 1 (minimum torque) to 24 (maximum torque).
- The drill icon (next to 24) is for drilling mode, which provides full torque without clutch action.
- Choose a lower torque setting for smaller screws or softer materials to prevent over-driving or stripping.
- Use higher torque settings for larger screws or harder materials.
6.4 2-Speed Gear Selector

Image: The 2-speed gear selector switch.
- The gear selector switch is located on top of the drill.
- Position '1' (low speed, 0-450 RPM) is ideal for high-torque applications like driving screws or drilling large holes.
- Position '2' (high speed, 0-1500 RPM) is suitable for fast drilling in softer materials or when less torque is required.
6.5 Hasken Aiki na LED
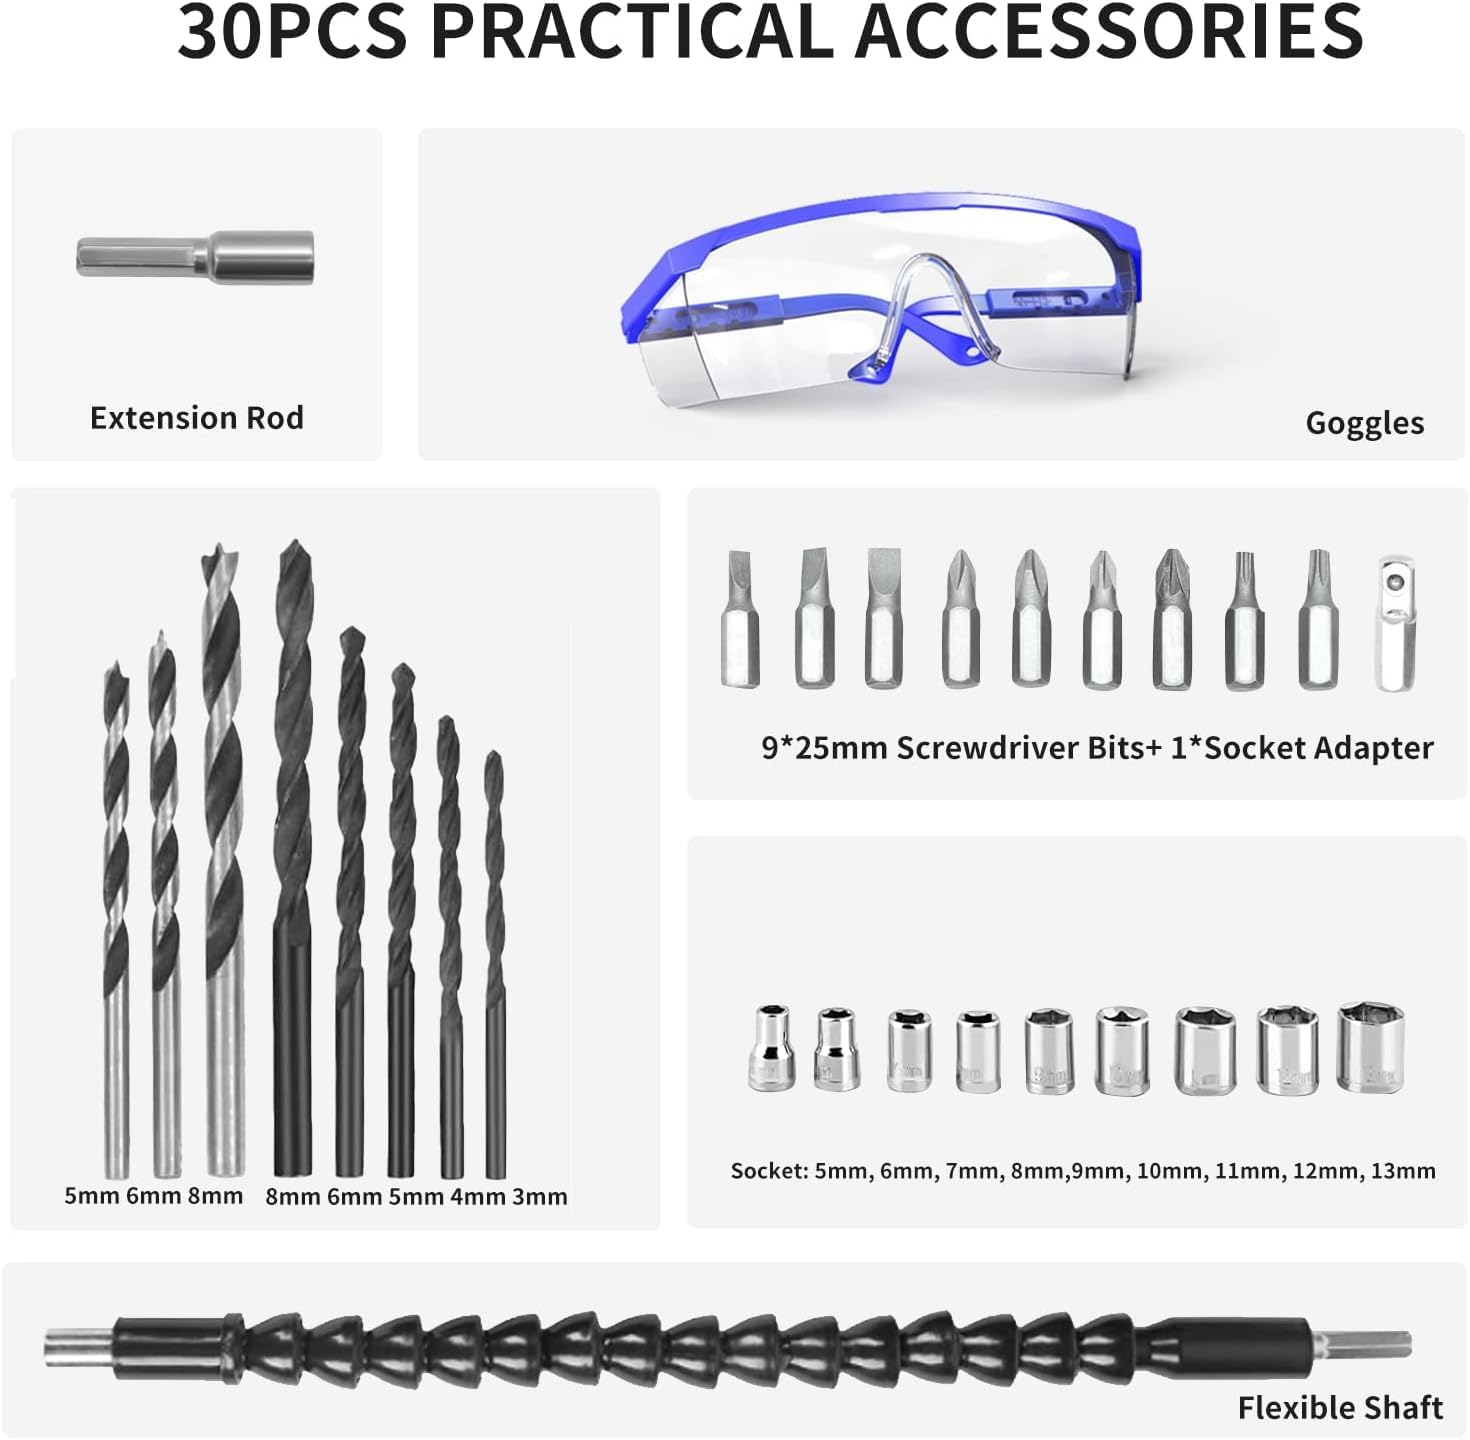
Image: The built-in LED light in action, illuminating a tight space.
- The integrated LED light automatically activates when the trigger is pressed.
- It provides illumination for working in dimly lit areas or confined spaces, improving visibility and accuracy.
6.6 Flexible Shaft Usage
- The flexible shaft accessory allows you to reach screws or drilling points in awkward or tight angles where the drill itself cannot fit.
- Simply insert the flexible shaft into the drill's chuck and secure it. Then, insert your desired screwdriver or drill bit into the other end of the flexible shaft.
Bidiyo: Overview of the GardenJoy Cordless Power Drill Set in various applications, demonstrating its versatility.
Video: A test video showcasing the GardenJoy 21V Max Cordless Drill's performance.
Video: Demonstrates the features and capabilities of the 21V Cordless Power Drill Set.
7. Kulawa
Regular maintenance ensures the longevity and optimal performance of your GardenJoy drill.
- Tsaftacewa: Bayan kowane amfani, goge injin da ruwa mai tsafta, damp cloth. Do not use harsh chemicals or abrasive cleaners. Keep the ventilation openings clear of dust and debris.
- Ajiya: Store the drill and its accessories in a dry, cool place, away from direct sunlight and moisture. Ensure the battery is removed from the drill before storage.
- Kulawar Baturi: For long-term storage, charge the battery to approximately 50% capacity. Recharge the battery every 3-6 months if not in use to maintain its health.
- Chuck Maintenance: Periodically check the chuck for any debris or wear. Clean the jaws if necessary to ensure proper bit gripping.
8. Shirya matsala
If you encounter any issues with your drill, refer to the table below for common problems and solutions.
| Matsala | Dalili mai yiwuwa | Magani |
|---|---|---|
| Drill baya kunna | Battery not charged or improperly installed; Forward/Reverse switch in center (locked) position. | Charge battery fully and ensure it is clicked into place; Move the Forward/Reverse switch to either forward or reverse position. |
| Rashin wutar lantarki yayin aiki | Battery low on charge; Overload due to excessive pressure or material. | Recharge the battery; Reduce pressure or use a higher torque setting/lower speed. |
| Bit ya zame a cikin chuck | Ba a matse maƙullin sosai ba; Bit shank ya yi datti ko ya lalace. | Tighten chuck firmly by hand; Clean or replace the bit. |
| Haɗa zafi sosai | Continuous heavy use; Blocked ventilation slots. | Allow the drill to cool down; Clear any obstructions from the ventilation slots. |
9. Ƙayyadaddun bayanai
| Siffar | Ƙayyadaddun bayanai |
|---|---|
| Alamar | GardenJoy |
| Lambar Samfura | FH-6198S |
| Tushen wutar lantarki | Ana Karfin Batir |
| Voltage | 21V (DC) |
| Ƙarfin baturi | Lithium Ion 1.5Ah |
| Matsakaicin Gudun Juyawa | 1500 RPM |
| Yawan Gudu | 2 (0-450 RPM / 0-1500 RPM) |
| Matsakaicin Torque | 280 in-lbs (30 NM) |
| Saitunan Wuta | 24+1 Position Clutch |
| Matsakaicin Girman Chuck | 3/8 Inches (Keyless) |
| Girman samfur | 7.5"L x 2.9"W x 8.3"H |
| Nauyin Abu | 2.02 fam |
| Siffofin Musamman | Built-In LED Working Light, Lightweight, Variable Speed, Cordless, Keyless Chuck, Magnetic Function |
| Kayan abu | Filastik, Metal |
10. Garanti da Tallafawa
GardenJoy stands behind the quality of its products. Your Cordless Power Drill Set comes with a 2-year machine warranty to ensure your satisfaction and provide peace of mind.
If you have any questions, concerns, or require assistance with your product, please do not hesitate to contact our customer service team. We are committed to providing excellent support and respond to all inquiries within 24 hours.
For support, please refer to the contact information provided on your purchase receipt or visit the official GardenJoy website.