
1. Muhimman Umarnin Tsaro
Please read all safety instructions carefully before using this product. Failure to follow these instructions may result in electric shock, fire, and/or serious injury.
- Kar ka operate the unit if it is damaged or has been modified.
- Kar ka jump start a frozen battery.
- Kar ka allow the smart jumper clamps to touch each other or connect the positive and negative clamps to the same battery terminal.
- Kar ka expose the unit to rain or extreme temperatures.
- A kiyaye nesa da yara.
- Ensure proper ventilation when operating the air compressor.
- Always disconnect the jumper cables from the jump starter unit first, then from the vehicle battery, after a successful jump start.
2. Abubuwan Kunshin
Tabbatar cewa duk abubuwan da aka jera a ƙasa suna cikin kunshin ku:
- 1 x BSMOOM G2 Car Battery Charger Jump Starter
- 1 x Smart Jumper Cables
- 1 x Tire Inflator Tube with 4 Nozzles Set
- 1 x Blower/Deflator Pump with 4 Nozzles Set
- 1 x USB-C Cajin caji
- 1 x Manual mai amfani (Wannan takarda)
3. Samfurin Ya Ƙareview
The BSMOOM G2 is a versatile 14-in-1 device designed for automotive emergencies and general utility. It combines a powerful jump starter, a 150PSI air compressor, and a 45W quick-charge power bank into one portable unit.
Mabuɗin fasali:
- 8000A Peak Current: Capable of jump starting all gas engines and diesel engines up to 14L.
- 150PSI Air Compressor: For inflating car tires, bicycle tires, sports equipment, and more.
- 45W Quick Charger: USB-C output for fast charging of smartphones, tablets, and other devices.
- Multi-aiki: Includes LED flashlight, SOS light, and warning light.
Abubuwan:
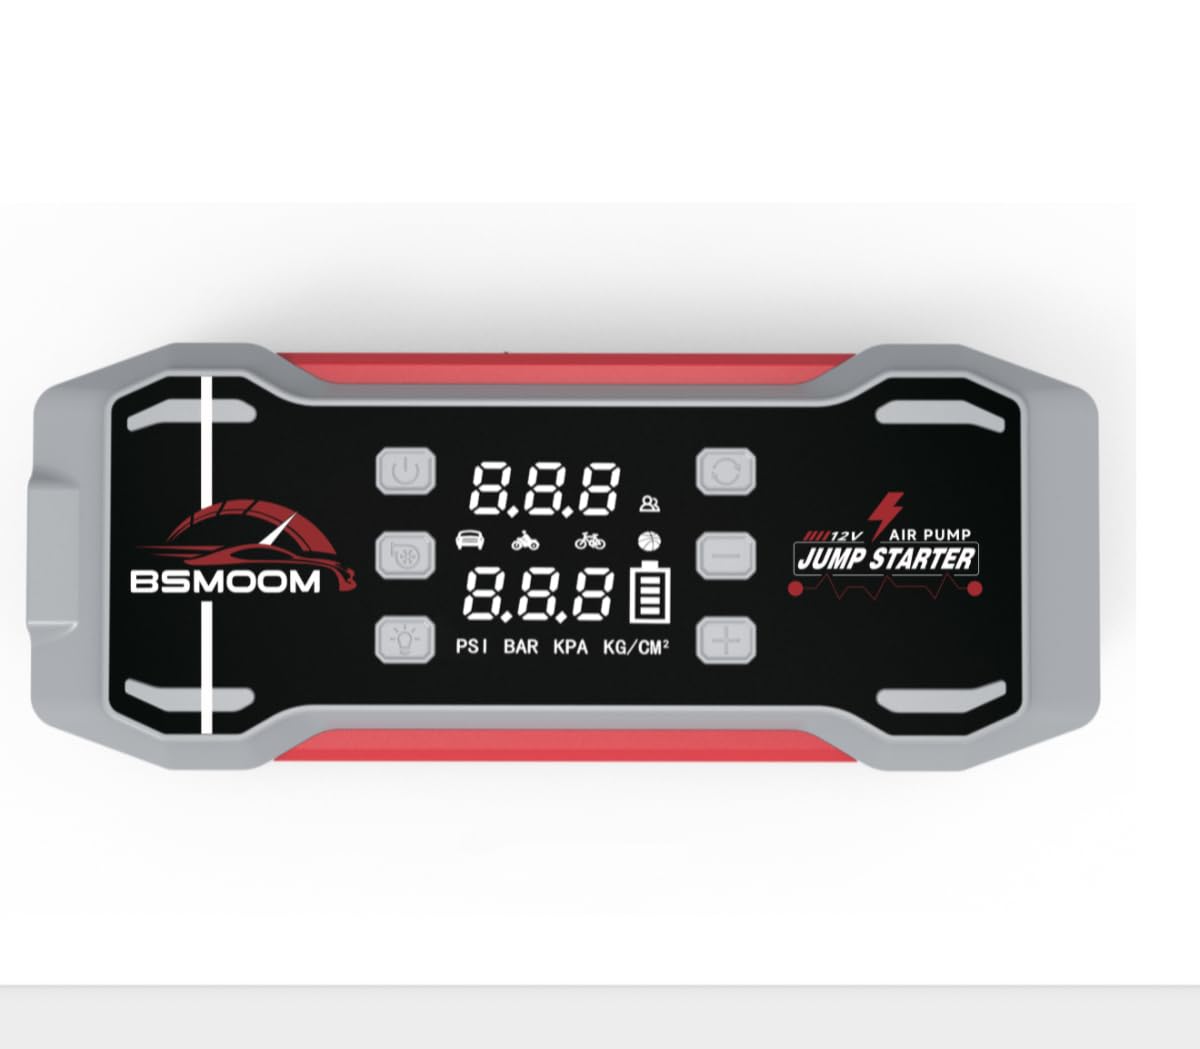
Hoto na 3.1: BSMOOM G2 Main Unit. This image displays the compact and robust design of the jump starter, featuring its various ports and display screen.
- Babban Sashe: Houses the battery, jump starter port, air compressor, USB output ports, and display.
- Smart Jumper Cables: Equipped with safety features to prevent reverse polarity and short circuits.
- Jirgin iska: Connects to the unit for tire inflation.
- Nozzle Set: Various adapters for different inflation needs.
4. Saita
4.1 Cajin Unit
Before first use, fully charge the BSMOOM G2 unit. It is recommended to charge the unit every 3-6 months to maintain battery health, even when not in use.
- Connect the provided USB-C charging cable to the USB-C input port on the BSMOOM G2.
- Connect the other end of the USB-C cable to a compatible USB wall adapter (not included) or a car charger.
- The display will indicate the charging status. The unit is fully charged when the battery indicator shows 100%.

Hoto na 4.1: USB-C Charging Port. This image highlights the location of the USB-C input port for charging the device.
4.2 Binciken Farko
- Ensure the unit is fully charged before attempting to jump start a vehicle or inflate tires.
- Inspect all cables and accessories for any signs of damage. Do not use if damaged.
5. Umarnin Aiki
5.1 Tsalle Fara Mota
The BSMOOM G2 can jump start 12V vehicles with all gas engines and diesel engines up to 14L.
- Ensure the jump starter unit has at least 50% charge.
- Kashe kunna motar da duk kayan haɗi.
- Insert the smart jumper cable plug into the jump starter's 12V output port. Ensure a firm connection.
- Haɗa da ja (+) clamp to the vehicle's positive battery terminal.
- Haɗa da baƙi (-) clamp to the vehicle's negative battery terminal.
- Check the indicator light on the smart jumper cable. A solid green light indicates a correct connection. If it's red or flashing, check connections and battery voltage.
- Start the vehicle's engine. If it doesn't start immediately, wait 30 seconds and try again. Do not crank for more than 3 seconds per attempt.
- Once the vehicle starts, immediately disconnect the baƙi (-) clamp from the vehicle battery, then the ja (+) clamp.
- Finally, disconnect the smart jumper cable plug from the jump starter unit.

Hoto na 5.1: Smart Jumper Cables. This image illustrates the correct connection of the smart jumper cables to a vehicle battery for jump starting.
5.2 Farashin Taya
The integrated air compressor can inflate tires up to 150 PSI.
- Screw the tire inflator tube onto the air output port of the BSMOOM G2.
- Attach the other end of the tube to the tire valve stem. Ensure a tight seal.
- Turn on the unit and select the desired pressure unit (PSI, BAR, KPA).
- Use the '+' and '-' buttons to set the target tire pressure.
- Press the start button to begin inflation. The compressor will automatically stop when the preset pressure is reached.
- Disconnect the tube from the tire valve and then from the unit.

Hoto na 5.2: Tire Inflator Hose. This image shows the tire inflator hose connected to the unit and ready for use.
5.3 Air Inflation/Deflation Pump
Use the blower/deflator pump with the appropriate nozzles for inflatables like air mattresses, swimming rings, or for quick deflation.
- Select the correct nozzle from the provided set for your inflatable item.
- Attach the nozzle to the blower/deflator port on the unit.
- For inflation, insert the nozzle into the item's air valve and turn on the pump.
- For deflation, connect the nozzle to the deflation port (if available, or reverse connection if applicable) and turn on the pump to extract air.

Hoto na 5.3: Blower/Deflator Pump and Nozzles. This image displays the blower/deflator pump attachment along with the various nozzles for different applications.
5.4 Amfani azaman Bankin Wuta
The BSMOOM G2 features a 45W Quick Charger for charging electronic devices.
- Connect your device's charging cable to one of the USB output ports on the BSMOOM G2.
- Na'urar za ta fara caji na'urarka ta atomatik.
- Kula da halin cajin na'urar ku. Cire haɗin lokacin da caji ya cika.
6. Kulawa da Adanawa
- Tsaftacewa: Shafa naúrar da bushe, kyalle mai laushi. Kada a yi amfani da sinadarai masu tsauri ko abubuwan da za su lalata.
- Cajin: Yi cajin naúrar kowane watanni 3-6 don hana zurfafa zurfafawa da tsawaita rayuwar baturi.
- Ajiya: Store the BSMOOM G2 in a cool, dry place, away from direct sunlight and extreme temperatures. Ensure it is fully charged before long-term storage.
- Kulawar Kebul: Keep jumper cables and air hoses neatly coiled and free from kinks or damage.
7. Shirya matsala
| Matsala | Dalili mai yiwuwa | Magani |
|---|---|---|
| Naúrar baya kunna. | Baturi ya ƙare. | Charge the unit fully using the provided USB-C cable. |
| Mota baya tsalle farawa. | Incorrect cable connection; vehicle battery too low; unit charge too low. | Tabbatar clamps are connected correctly (red to +, black to -). Check unit's charge level. Try again after 30 seconds. |
| Ba a buƙatar na'urar sanyaya iska (air compressor). | Hose not securely attached; target pressure not set; unit charge too low. | Ensure hose is tightly screwed on. Set desired pressure. Charge the unit. |
| Smart jumper cable indicator is red/flashing. | Reverse polarity; short circuit; battery voltage yayi kasa sosai. | Cire haɗin kuma sake haɗa clamps daidai. Tabbatar clamps do not touch. If battery is severely damaged, jump starting may not be possible. |
8. Ƙayyadaddun bayanai
| Siffar | Daki-daki |
|---|---|
| Alamar | BSMOOM |
| Samfura | G2 |
| Kololuwar Fitar Yanzu | 8000 Amps |
| Ampzamanin | 8000 Amps |
| Voltage | 12 Volts |
| Nau'in Baturi | Lithium Polymer (an haɗa da batura 4) |
| Girman samfur (D x W x H) | 11.65" x 4.53" x 5.16" |
| Nauyin Abu | 3.08 fam |
| Nau'in Sabis na Abin hawa | ATV, Motorcycle, Passenger Car, RV, Scooter, Lawn Mower, Snowmobile, Tractor |
| Matsi na Matsawar Iska | Har zuwa 150 PSI |
| Fitar USB | 45W Quick Charger |
9. Garanti da Tallafawa
BSMOOM products are manufactured to high-quality standards. This product comes with a limited warranty from the date of purchase. Please refer to the warranty card included in your package for specific terms and conditions.
For technical support, warranty claims, or general inquiries, please contact BSMOOM customer service through the retailer where the product was purchased or visit the official BSMOOM website (idan akwai).
Please have your model number (G2) and purchase information ready when contacting support.