
1. Gabatarwa
This manual provides detailed instructions for the installation, operation, and maintenance of your STUDIOFINIX Bluetooth 5.4 4-Zone 8-Channel Audio Amplifier Receiver. This amplifier is designed to deliver high-fidelity audio across multiple rooms, offering independent zone control, various input options, and a professional karaoke function. Please read this manual thoroughly before use to ensure proper setup and optimal performance.
2. Umarnin Tsaro
- Tushen wutar lantarki: Yi amfani da adaftar wutar lantarki da aka bayar kawai. Tabbatar da ƙarfin wutar lantarkitage ya dace da buƙatun da aka ƙayyade akan na'urar.
- Samun iska: Do not block any ventilation openings. Install in a location with adequate airflow to prevent overheating.
- Ruwa da Danshi: Do not expose the unit to rain, moisture, or dripping/splashing liquids. Keep away from water sources.
- Zafi: Kada a sanya kusa da hanyoyin zafi kamar radiators, rejista na zafi, murhu, ko wasu na'urori da ke samar da zafi.
- Tsaftacewa: Unplug the unit from the power outlet before cleaning. Use a dry, soft cloth only.
- Hidima: Kada kayi yunƙurin yiwa wannan samfur sabis da kanka. Koma duk sabis ɗin zuwa ƙwararrun ma'aikatan sabis.
- Tashin hankali na Kakakin: Ensure connected speakers have an impedance of 4-8 ohms. Connecting speakers with lower impedance may damage the ampmai sanyaya wuta.
3. Abubuwan Kunshin
Tabbatar cewa duk abubuwan da aka jera a ƙasa suna cikin kunshin ku:
- STUDIOFINIX Ampfawa x1
- Adaftar Wuta x 1
- Black Terminal Connectors x 4
- Littafin koyarwa x 1

Figure 3.1: Package Contents. The image displays the amplifier unit, its power adapter, four black terminal connectors, and the user manual.
4. Samfurin Ya Ƙareview
4.1 Gabatarwa Panel
The front panel provides access to primary controls and input ports for convenient operation.

Figure 4.1: Front Panel Layout. Key controls include the Volume/Power ON/OFF knob, MIC VOL knob, MIC input, AUX input, USB port, TF Card slot, and Bass/Treble adjustment knobs.
- VOLUME/PWR ON/OFF: Controls the master volume and powers the unit on/off.
- MIC VOL: Yana daidaita ƙarar makirufo da aka haɗa.
- Shigar MIC: 3.5mm jack for microphone connection.
- Shigar da AUX: 3.5mm jack for auxiliary audio devices.
- Tashar USB: Don kunna sauti files daga kebul na USB.
- Katin Katin TF: Don kunna sauti files from a TF (MicroSD) card.
- BASS/TURA: Adjusts the low and high frequency response of the audio output.
4.2 Babban Gabatarwa
The top panel features controls for mode selection, playback, and echo effects for karaoke.

Figure 4.2: Top Panel Layout. This view highlights the MODE button, playback controls (Fast Retreat/Previous Song, Play/Pause, Fast Forward/Next Song), and the ECHO button for microphone effects.
- kwatance: Switches between input sources (Bluetooth, Optical, AUX, LINE IN, USB, TF Card).
- Ikon sake kunnawa: Buttons for previous track, play/pause, and next track when using USB/TF card or Bluetooth.
- EHO: Activates and adjusts the echo effect for the microphone input.
- Zone Control Buttons (1, 2, 3, 4): Independently turn on or off each of the four audio zones.
4.3 Back Panel Introduction
The back panel contains the main speaker outputs and additional wired input options.

Figure 4.3: Back Panel Layout. This image shows the DC IN port, speaker output terminals for Zones 1-4 (supporting 8 speakers), Optical input, and stereo RCA Line In (R/L) inputs.
- DC IN: Power input port for the provided power adapter.
- Speaker Outputs (ZONE 1-4): Connect up to 8 speakers (2 per zone) with 4-8 ohm impedance. Red terminals are positive (+), black terminals are negative (-).
- Gabatarwa: Digital audio input for connecting devices like TVs or game consoles.
- LINE IN (R/L): Stereo RCA inputs for connecting analog audio sources.
5. Saita
5.1 Haɗin Kakakin Majalisa
The amplifier supports up to 8 speakers, divided into 4 independent zones. Ensure your speakers have an impedance of 4-8 ohms.
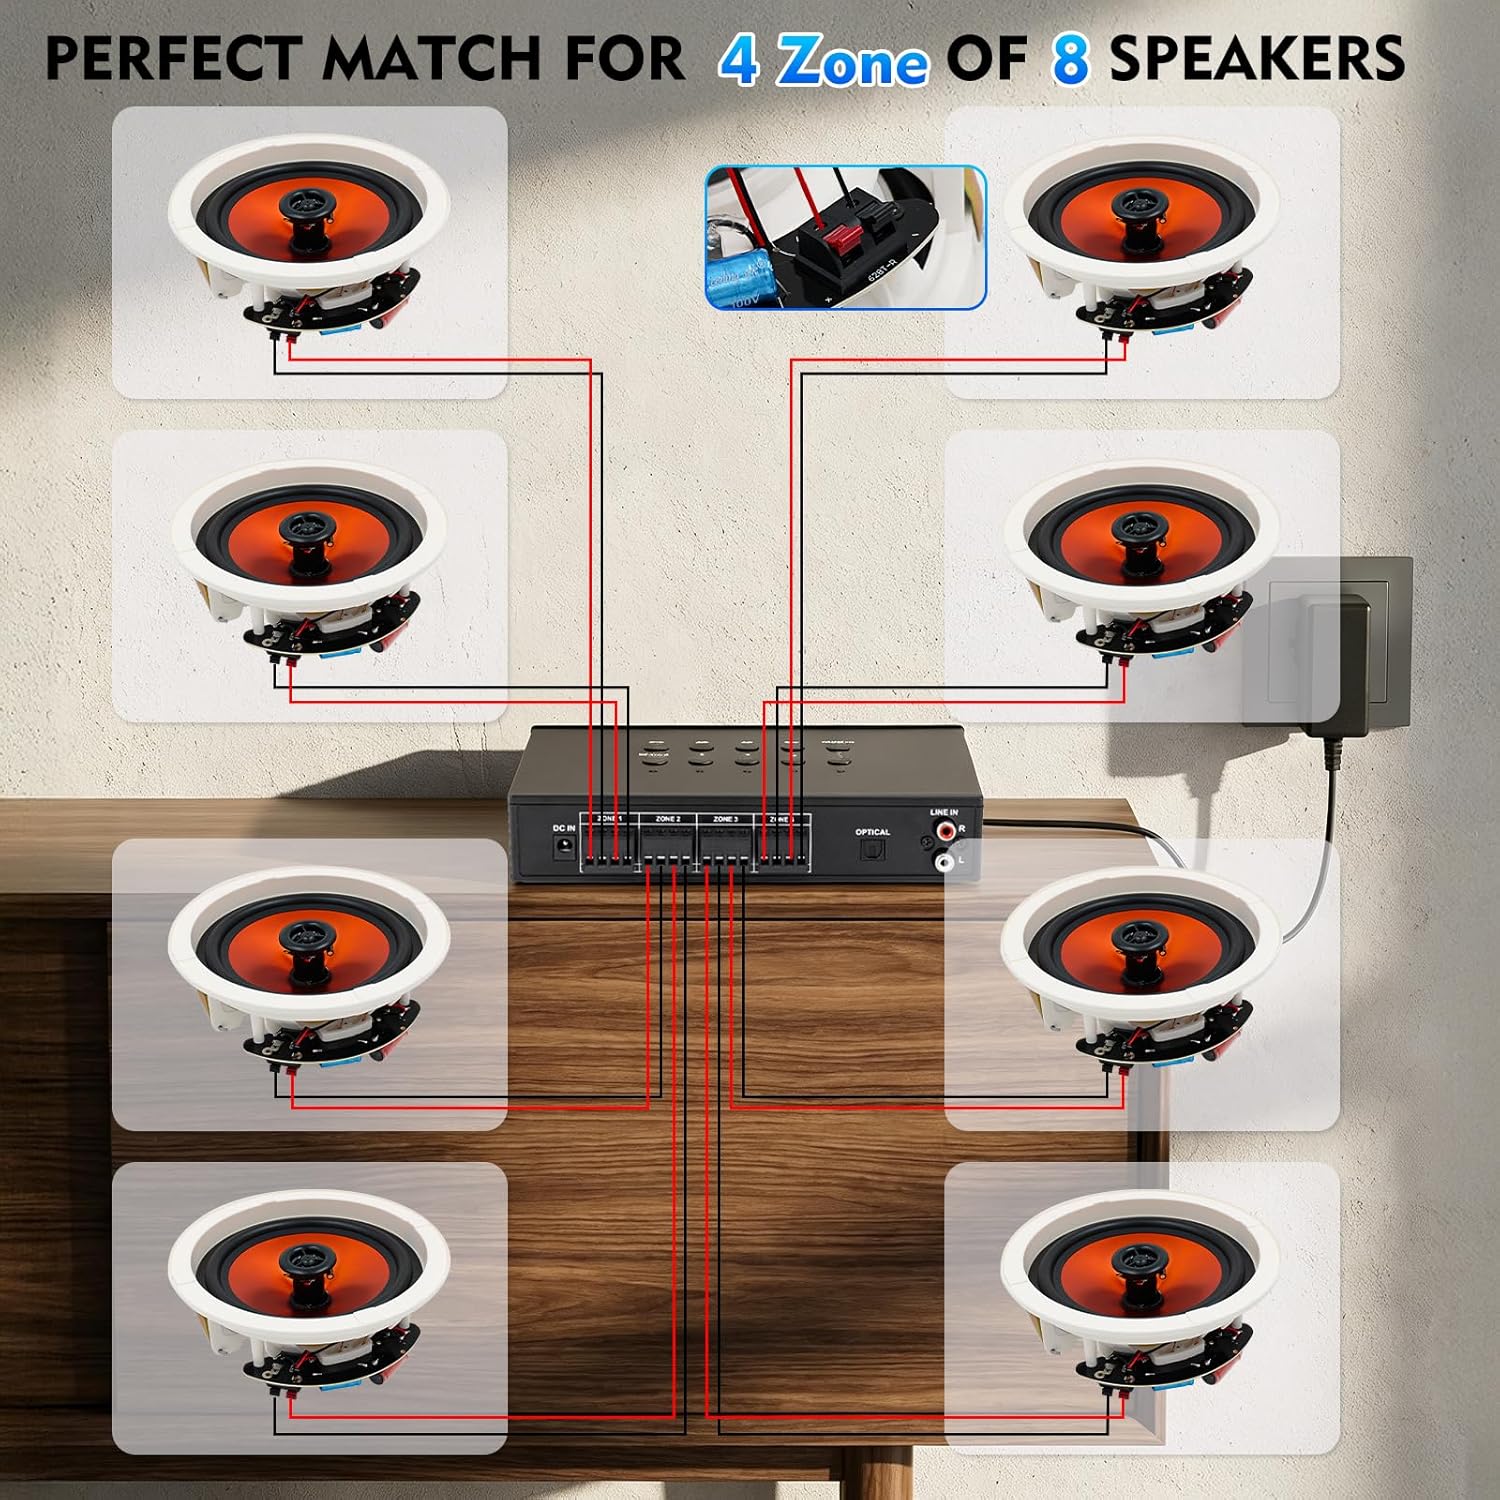
Figure 5.1: Speaker Wiring Diagram. This illustration demonstrates connecting two speakers per zone, with red wires to positive (+) terminals and black wires to negative (-) terminals on the ampɓangaren bayan lifier.
- Gano tabbataccen tasha (+) da korau (-) akan lasifikan ku.
- Connect the positive (+) wire from each speaker to the corresponding red (+) terminal on the amplifier for the desired zone.
- Connect the negative (-) wire from each speaker to the corresponding black (-) terminal on the amplifier for the desired zone.
- Repeat for all speakers across the 4 zones. Ensure all connections are secure.
5.2 Haɗin Wuta
After connecting all speakers and audio sources, connect the power adapter.
- Insert the DC plug of the power adapter into the 'DC IN' port on the back of the ampmai sanyaya wuta.
- Haɗa adaftar wutar lantarki a cikin wurin fitar da wutar lantarki mai dacewa a bango.
6. Umarnin Aiki
6.1 Kunna/Kashewa da Ikon Ƙara
- Don iko a kan amplifier, rotate the VOLUME/PWR ON/OFF knob clockwise until the display illuminates.
- To power off, rotate the knob counter-clockwise until it clicks off.
- Adjust the master volume by rotating the VOLUME/PWR ON/OFF dunƙule.
6.2 Zaɓin Tushen shigarwa
Danna maɓallin MODE button on the top panel to cycle through available input sources: Bluetooth, Optical, AUX, LINE IN, USB, and TF Card.
6.3 Haɗin Bluetooth
Don haɗa na'urar Bluetooth:

Figure 6.1: Bluetooth Connectivity. The image shows a smartphone successfully paired with the amplifier, indicating stable Bluetooth 5.4 connection for wireless audio streaming.
- Zaɓi yanayin Bluetooth ta amfani da MODE button. The display will show "BT" or a similar indicator.
- A kan wayowin komai da ruwan ku, kwamfutar hannu, ko wata na'urar da ta kunna Bluetooth, kunna Bluetooth kuma bincika samammun na'urori.
- Select "STUDIOFINIX" or a similar name from the list to pair.
- Da zarar an haɗa su, za ku iya jera audio ba tare da waya ba zuwa ga ampmai sanyaya wuta.
6.4 Wired Input Operation
The amplifier supports various wired audio sources:

Figure 6.2: Multiple External Audio Sources. This graphic illustrates the diverse input options available, including Microphone, Bluetooth, USB, AUX, and TF Card, allowing connection of various external devices.
- Input na gani: Connect a digital audio cable from your source (e.g., TV, game console) to the OPTICAL port on the back panel. Select Optical mode using the MODE maballin.
- Shigar da AUX: Connect a 3.5mm audio cable from your device to the AUX port on the front panel. Select AUX mode.
- LAYI CIKIN: Connect RCA cables from your analog audio source (e.g., CD player) to the LINE IN (R/L) ports on the back panel. Select LINE IN mode.
- Katin USB/TF: Insert a USB drive or TF card into the respective slot on the front panel. The amplifier will automatically switch to USB or TF mode and begin playback. Use the playback controls on the top panel to manage tracks.
6.5 Karaoke Aiki
Enjoy karaoke with the built-in microphone input and echo effect.

Figure 6.3: Karaoke Ready. This image depicts individuals enjoying a karaoke session, highlighting the amplifier's capability to connect a microphone for vocal performances.
- Toshe makirufo a cikin Shigar MIC a bango na gaba.
- Daidaita ƙarar makirufo ta amfani da MIC VOL dunƙule.
- Danna maɓallin ECHO button on the top panel to activate and adjust the echo effect for your vocals.
6.6 Kula da Yanki Mai Zaman Kanta
The amplifier allows you to independently control the power for each of the four speaker zones.

Figure 6.4: 4-Zone Independent Control. This visual demonstrates how the amplifier can manage audio in four separate areas, allowing users to turn zones on or off as needed for multi-room audio customization.
- Yi amfani da sadaukarwa ZONE 1, ZONE 2, ZONE 3, ZONE 4 buttons on the top panel to toggle each zone on or off.
- Note that while zones can be independently turned on/off, the overall volume, bass, and treble settings apply to all active zones simultaneously.
6.7 Bass and Treble Daidaita
Adjust the audio's tonal characteristics using the bass kuma TAFIYA knobs on the front panel to suit your preference.
7. Kulawa
- Tsaftacewa: Disconnect the power before cleaning. Use a soft, dry cloth to wipe the exterior of the unit. Do not use liquid cleaners or aerosol sprays.
- Ajiya: If storing the unit for an extended period, disconnect it from power and store in a cool, dry place away from direct sunlight.
- Samun iska: Regularly check that ventilation openings are clear of dust and debris.
8. Shirya matsala
| Matsala | Dalili mai yiwuwa | Magani |
|---|---|---|
| Babu iko | Power adapter not connected; Power outlet not working; Unit is off. | Ensure power adapter is securely connected and plugged into a live outlet. Turn the VOLUME/PWR ON/OFF knob clockwise. |
| Babu sauti daga masu magana | Incorrect input source selected; Speaker wires loose or incorrectly connected; Volume too low; Specific zone turned off. | Press MODE to select the correct input. Check speaker wire connections (positive/negative). Increase master volume. Ensure the relevant zone button is ON. |
| Bluetooth ba ya haɗi | Not in Bluetooth mode; Device too far; Device already connected to another ampmai sanyaya wuta. | Select Bluetooth mode. Move device closer to the amplifier. Cire haɗin daga wasu na'urorin Bluetooth kuma gwada sake haɗawa. |
| Makirifo baya aiki | Microphone not plugged in; MIC VOL too low. | Ensure microphone is securely plugged into the MIC input. Increase the MIC VOL knob. |
| Katin USB/TF ba ya kunnawa | Incorrect mode; Incompatible file Tsarin; Kafofin watsa labarai masu lalacewa. | Select USB or TF mode. Ensure audio files are in a supported format (e.g., MP3). Try a different USB drive or TF card. |
9. Ƙayyadaddun bayanai
| Siffar | Ƙayyadaddun bayanai |
|---|---|
| Alamar | STUDIOFINIX |
| Lambar Samfura | ST-AMP-8PBT-BK-US |
| Yawan Tashoshi | 8 |
| Fitar Wattage | 480 Watts (Jimlar) |
| Sigar Bluetooth | 5.4 |
| Tashin hankali na Kakakin | 4-8 ohms |
| Zaɓuɓɓukan shigarwa | Optical, AUX, LINE IN, USB, TF Card, MIC, Bluetooth |
| Amsa Mitar | ±2dB@20-20kHz |
| Alamar sigina-zuwa-Noise Ratio | 85dB ku |
| Girma (L x W x H) | 195mm x 40mm x 140mm (Approx.) |
10. Garanti Bayani
This STUDIOFINIX amplifi ya zo da a Garanti mai iyaka na Shekaru 1 from the date of purchase. This warranty covers manufacturing defects in materials and workmanship under normal use. It does not cover damage caused by misuse, accident, unauthorized modification, or improper installation. Please retain your proof of purchase for warranty claims.
11. Tallafin Abokin Ciniki
For technical assistance, warranty claims, or general inquiries, please contact STUDIOFINIX customer support through the retailer's platform or visit the official STUDIOFINIX website don bayanin lamba.
Taimako kan layi: www.studiofinix.com