1. Gabatarwa
This manual provides detailed instructions for the proper installation, operation, and maintenance of your Lanzar VIBE211 Vibe 360 Watt 2 Channel Mosfet Amplifier. Da fatan za a karanta wannan jagorar sosai kafin ƙoƙarin shigarwa ko sarrafa ta. amplifier don tabbatar da ingantaccen aiki da aminci.
2. Bayanin Tsaro
Koyaushe kiyaye matakan tsaro masu zuwa yayin shigarwa da aiki:
- Disconnect the vehicle's negative battery terminal before any wiring connections are made.
- Tabbatar cewa an lalatar da duk wayoyi da kyau kuma an kiyaye su don hana lalacewa ko gajerun kewayawa.
- Yi amfani da wayoyi masu dacewa don haɗin wutar lantarki da ƙasa kamar yadda aka ƙayyade a cikin sashin shigarwa.
- Dutsen da amplifier securely in a location that allows for adequate ventilation and is protected from moisture and excessive heat.
- Kar a yi aiki da amplifier if it is damaged or malfunctioning. Refer to the troubleshooting section or seek professional assistance.
3. Samfurin Ya Ƙareview
The Lanzar VIBE211 is a 2-channel Mosfet amplifier designed for car audio systems. It features a bridgeable design, allowing for flexible configuration, and incorporates a regulated Mosfet power supply for stable performance. Key features include variable high/low pass crossover controls and a remote subwoofer bass control.
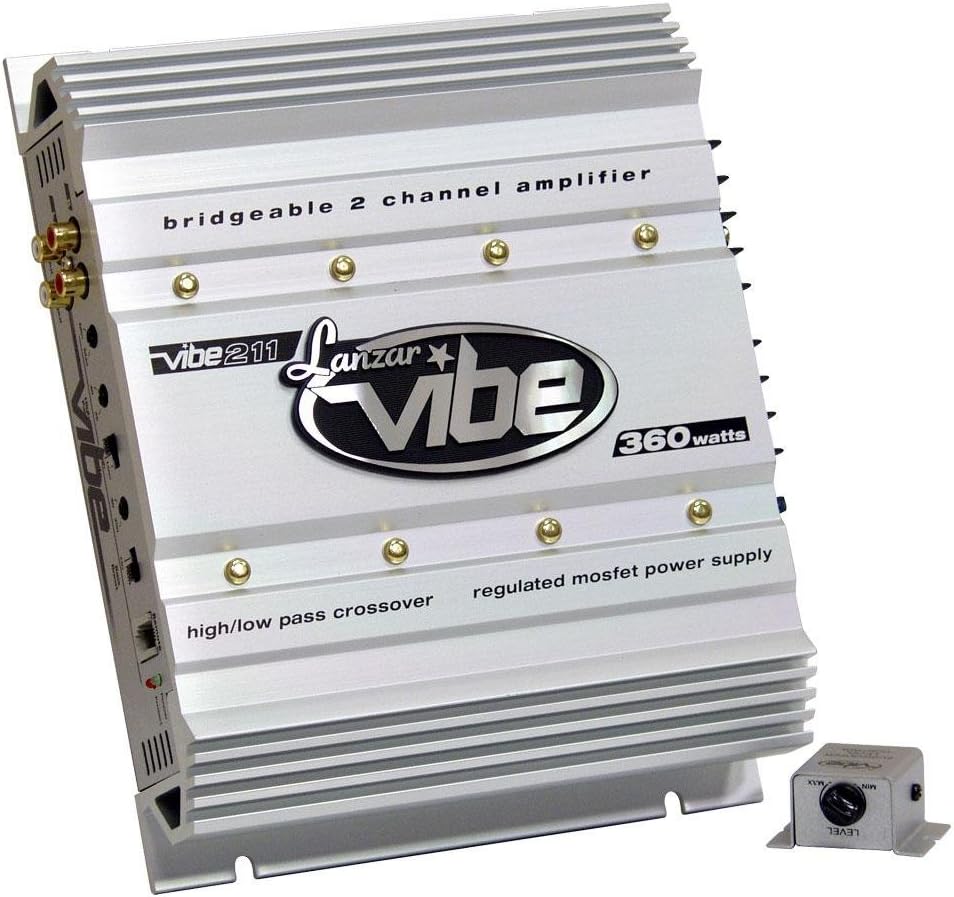
A kusurwa view of the silver Lanzar VIBE211 Vibe 360 Watt 2 Channel Mosfet Amplifi, showcasing its finned heatsink design, RCA inputs, and control panel. The amplifier features text indicating 'bridgeable 2 channel amplifier', 'vibe 211', 'Lanzar vibe', '360 watts', 'high/low pass crossover', and 'regulated mosfet power supply'. A small, separate remote bass level control unit is visible in the foreground.
4. Saita da Shigarwa
4.1 Haɗawa Amplififi
Choose a secure mounting location that provides adequate air circulation around the amplifier's heatsink. Avoid mounting in direct sunlight or areas prone to moisture. Use the provided mounting hardware to secure the amplifi da ƙarfi zuwa ƙaƙƙarfan wuri.
4.2 Haɗin Waya
Ensure all connections are tight and properly insulated to prevent short circuits.
- Ƙarfi (B+): Connect a heavy-gauge wire (e.g., 8 AWG or larger) directly from the positive terminal of the vehicle's battery to the amplifier's B+ terminal. Install an appropriate fuse (15A) within 18 inches of the battery.
- Kasa (GND): Connect a heavy-gauge wire of the same size as the power wire from the amplifier's GND terminal to a clean, unpainted metal surface of the vehicle chassis. Ensure a good electrical connection.
- Nesa (REM): Connect a smaller gauge wire (e.g., 18 AWG) from the amplifier's REM terminal to the remote turn-on output of your head unit. This wire turns the ampAna kunna ko kashe lifier ɗin tare da sitiriyo ɗinku.
- Bayanin RCA: Connect the RCA audio cables from your head unit's pre-amp fitarwa zuwa ga amplifier's Gold RCA Inputs. The amplifier includes Line Outs for Left and Right Channels for daisy-chaining to other ampmasu rayarwa.
- Abubuwan da aka fitar: Haɗa lasifikarka zuwa amplifier's speaker terminals. Observe correct polarity (+ to + and - to -). The amplifier is 2 Ohm stereo stable and bridgeable at 4 Ohms.
- Remote Subwoofer Bass Control: Connect the remote bass control unit to the designated port on the amplifier. Mount the control unit in an accessible location for easy adjustment.
5. Umarnin Aiki
5.1 Ƙarfin Farko
After all connections are made, reconnect the vehicle's negative battery terminal. Turn on your head unit. The amplifier features Soft Turn On/Off circuitry to prevent pops and clicks. Power Protection LED Indicators will illuminate to show operational status.
5.2 Adjusting Input Level Controls
The amplifier has Variable Input Level Controls. Start with the amplifier's input level set to minimum. Play a familiar piece of music through your head unit at about 75% of its maximum volume. Slowly increase the amplifier's input level until you hear slight distortion, then back it off slightly. This ensures the amplifier receives an optimal signal without clipping.
5.3 Saitunan Ketarewa
The amplifier features Variable High Low Pass Crossover Controls. These allow you to filter specific frequencies to your speakers or subwoofers.
- Tace Mai Girma (HPF): Used for full-range speakers to prevent low frequencies from reaching them, improving clarity.
- Matattarar Passarfin Passasa (LPF): Used for subwoofers to allow only low frequencies to pass, enhancing bass response.
Adjust these controls to match the frequency response characteristics of your speakers and subwoofers.
5.4 Bass Boost Circuit
The built-in Bass Boost Circuit allows for an increase in bass output at specific frequencies. Use this feature sparingly and adjust to your preference, avoiding excessive boosting that could lead to distortion or speaker damage.
5.5 Bridged Mode Operation
The amplifier can be bridged at 4 Ohms to combine the power of both channels into a single, higher-power output, typically for driving a subwoofer. Refer to the wiring diagram for specific instructions on bridging the ampmai sanyaya wuta.
6. Kulawa
The Lanzar VIBE211 amplifier requires minimal maintenance. Periodically inspect the wiring connections for tightness and corrosion. Keep the amplifier's heatsink clean and free of dust or debris to ensure proper cooling. Use a soft, dry cloth for cleaning the exterior.
7. Shirya matsala
Idan kun fuskanci matsaloli tare da ku ampLifier, duba teburin da ke ƙasa kafin neman sabis na ƙwararru:
| Matsala | Dalili mai yiwuwa | Magani |
|---|---|---|
| Babu Power / Babu Sauti | Blown fuse; Loose power/ground/remote wire; Faulty head unit. | Check and replace fuse; Verify all power, ground, and remote connections; Test head unit functionality. |
| Karkataccen Sauti | Input level too high; Speaker impedance too low; Damaged speakers. | Adjust input level; Verify speaker impedance (2 Ohm stereo stable, 4 Ohm bridged); Inspect speakers for damage. |
| Amplifier Goes into Protection Mode | Overheating; Short circuit in speaker wiring; Low voltage. | Ensure adequate ventilation; Check speaker wires for shorts; Verify battery voltage da tsarin caji. |
| Babu Bass daga Subwoofer | LPF not enabled or set too high; Phase issue; Remote bass control set to minimum. | Adjust LPF setting; Check subwoofer phase; Increase remote bass control level. |
8. Ƙayyadaddun bayanai
Technical specifications for the Lanzar VIBE211 amplififi:
- Power Output (RMS @ 4 Ohms): 2 x 90 watts
- Power Output (Max @ 4 Ohms): 2 x 180 watts
- Power Output (Max Bridged @ 4 Ohms): 1 x 360 watts
- Power Output (RMS @ 2 Ohms): 2 x 150 watts
- AmpNau'in lifier: 2 Channel Mosfet
- Amsa Mitar: 15 Hz - 35 kHz
- Rabon Sigina-zuwa-Amo (S/N): 90 dB
- Rage FuseSaukewa: 15A
- Girma (W x H x L): 10.25 inci x 2 inci x 8 inci
- Sarrafa Matsayin shigarwa: Mai canzawa
- Gudanarwar Crossover: Variable High/Low Pass
- Kwanciyar hankali: 2 Ohm Stereo Stable, Bridgeable at 4 Ohms
- Kare Kariya: Advanced Power Protection LED Indicators
- Ƙarin Halaye: Remote Subwoofer Bass Control, Electronic Crossover Network, Bass Boost Circuit, Soft Turn On/Off
9. Garanti da Tallafawa
9.1 Bayanin Garanti
The Lanzar VIBE211 amplifi ya zo da a 1-SHEKARA limited warranty from the date of purchase. This warranty covers defects in materials and workmanship under normal use. Please retain your proof of purchase for warranty claims. The warranty does not cover damage caused by improper installation, accident, misuse, abuse, negligence, or unauthorized modification.
9.2 Tallafin Abokin Ciniki
For technical assistance, troubleshooting beyond this manual, or warranty service, please contact Lanzar customer support. Refer to the official Lanzar website or product packaging for current contact information.


