Gabatarwa
This manual provides essential instructions for the installation, operation, and maintenance of the Riello RG1R 3007656 Nozzle Assembly. This component is designed for use with Riello Gulliver RG1R-364T1 burners. Please read this manual thoroughly before proceeding with any installation or operation to ensure safe and efficient use.
Bayanin samfur: The Riello RG1R 3007656 is a complete nozzle assembly that includes a preheating element and a thermostat. It is specifically designed for compatibility with Gulliver RG1R-364T1 burner models.
Bayanin Tsaro
- Dole ne ma'aikata masu ƙwarewa kawai su yi shigarwa da gyara.
- Ensure the power supply to the burner is disconnected before any installation or maintenance work.
- Refer to the main burner manual for additional safety guidelines.
- Wear appropriate personal protective equipment (PPE) during installation and servicing.
Abubuwan Kunshin
Tabbatar da cewa duk abubuwan da aka gyara suna nan kuma basu lalace ba bayan kwashe kaya:
- Riello RG1R 3007656 Nozzle Assembly (with preheating and thermostat)
- Manual Umarni (wannan takarda)
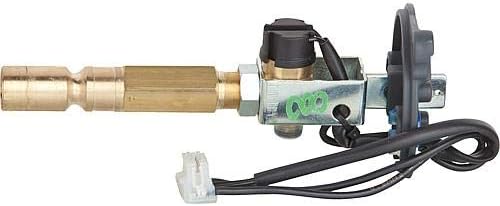
Hoto 1: Gefe view of the Riello RG1R 3007656 Nozzle Assembly. This image shows the brass nozzle body, the electrical connections for the preheater and thermostat, and the mounting bracket.
Saita da Shigarwa
- Shiri:
- Ensure the burner is completely shut down and isolated from the electrical supply.
- Allow the burner to cool down if it has been in operation.
- Gather necessary tools (e.g., wrenches, screwdrivers, multimeter).
- Removal of Old Nozzle Assembly (if applicable):
- Carefully disconnect any electrical wiring connected to the old nozzle assembly. Note the wiring configuration for reinstallation.
- Unscrew and remove the old nozzle assembly from the burner head.
- Installation of New Nozzle Assembly:
- Insert the new Riello RG1R 3007656 Nozzle Assembly into the designated position on the burner head.
- Secure the assembly firmly, ensuring proper alignment.
- Connect the electrical wiring to the preheating element and thermostat. Refer to the burner's wiring diagram for correct connections. Ensure all connections are secure.
- Tabbatarwa:
- Double-check all connections and ensure the assembly is securely mounted.
- Confirm that no tools or foreign objects are left inside the burner.

Hoto 2: Sama-sama view of the Riello RG1R 3007656 Nozzle Assembly. This perspective highlights the electrical connector and the overall compact design of the unit.
Umarnin Aiki
The Riello RG1R 3007656 Nozzle Assembly operates in conjunction with the main burner control system. Once installed, its operation is largely automatic.
- Kunna Wuta: Restore electrical power to the burner system.
- Preheating Cycle: The integrated preheating element will activate automatically to bring the fuel to the optimal temperature before ignition. The thermostat monitors and regulates this temperature.
- Burner Start-up: Initiate the burner start-up sequence as per the main burner's operating manual. The preheated fuel will be atomized and ignited.
- Aiki na al'ada: The nozzle assembly will continue to function, ensuring consistent fuel delivery and temperature regulation during burner operation.
Lura: Do not attempt to manually adjust the thermostat on the nozzle assembly unless specifically instructed by a qualified technician or the main burner manual. Improper adjustments can lead to inefficient operation or safety hazards.
Kulawa
Regular maintenance ensures optimal performance and longevity of the nozzle assembly. All maintenance should be performed by qualified service personnel.
- Binciken Shekara-shekara: It is recommended to inspect the nozzle assembly annually as part of the burner's routine maintenance.
- Nozzle Cleaning/Replacement: Over time, nozzles can become clogged or worn. Inspect the nozzle for signs of wear, damage, or carbon buildup. Replace the nozzle if necessary.
- Haɗin Wutar Lantarki: Check all electrical connections for tightness and signs of corrosion.
- Preheater and Thermostat Check: Verify the proper functioning of the preheating element and thermostat using appropriate testing equipment.

Hoto 3: Angled view of the Riello RG1R 3007656 Nozzle Assembly. This view provides a clearer look at the wiring harness and the connection points.
Shirya matsala
This section provides basic troubleshooting steps. For complex issues, consult a qualified technician.
| Matsala | Dalili mai yiwuwa | Magani |
|---|---|---|
| Burner ya kasa kunna wuta | Nozzle clogged or damaged; Preheater malfunction; Thermostat issue; Incorrect wiring. | Inspect and clean/replace nozzle. Check preheater and thermostat functionality. Verify electrical connections. |
| Poor flame quality | Partially clogged nozzle; Incorrect fuel temperature. | Clean or replace nozzle. Check preheater and thermostat operation. |
| Preheater not working | Electrical fault; Faulty preheater element. | Check electrical supply and connections. Test preheater element for continuity. Replace if faulty. |
Ƙayyadaddun bayanai
- Samfura: Riello RG1R 3007656
- Daidaituwa: Riello Gulliver RG1R-364T1 Burners
- Abubuwan: Nozzle, Preheating Element, Thermostat
- Mai ƙira: Riello
- ASIN: B08L5VB4P3
Garanti da Taimako
For warranty information and technical support, please refer to the documentation provided with your complete Riello burner system or contact your authorized Riello dealer. Specific warranty terms for individual components like this nozzle assembly are typically covered under the main burner's warranty.
Mai ƙira: Riello
Tuntuɓar: Please refer to the official Riello website or your local distributor for service contact information.


