1. Gabatarwa da Ƙarsheview
This manual provides detailed instructions for the installation, operation, and maintenance of your Yansoo 3-Channel Dash Cam. Please read this manual thoroughly before using the device to ensure proper functionality and safety.
Siffofin samfur:
- 3-Channel Recording: Simultaneously captures video from the front (170° wide-angle), rear (165°), and inside (140°) of your vehicle.
- Bidiyo Mai Ma'ana Mai Kyau: Supports 1080P Front video + AHD-720P Rear video + AHD-720P Inside video.
- Ingantattun Hangen Dare: Features 4 unique infrared LED fill lights, F1.8 aperture, and WDR technology for optimal performance in low light.
- Emergency Lock (G-Sensor): Automatically detects sudden shocks or collisions and locks the current video footage don hana sake rubutawa.
- Rikodin madauki: Continuously records and automatically overwrites the oldest unlocked video files lokacin da katin ƙwaƙwalwar ajiya ya cika.
- Kula da Motar: Activates recording when motion or shocking is detected while parked (requires separate hardwire kit for 24/7 monitoring).
- Adjustable Interior Camera: The interior lens can be rotated 60° for flexible positioning.
Abubuwan Kunshin:
- Yansoo 3-Channel Dash Cam Unit
- Kamara ta baya tare da Cable
- Dutsen Kogin Tsotsa
- Car Charger (Type-C)
- USB Data Cable
- Manual mai amfani
- Mounting Hardware for Rear Camera
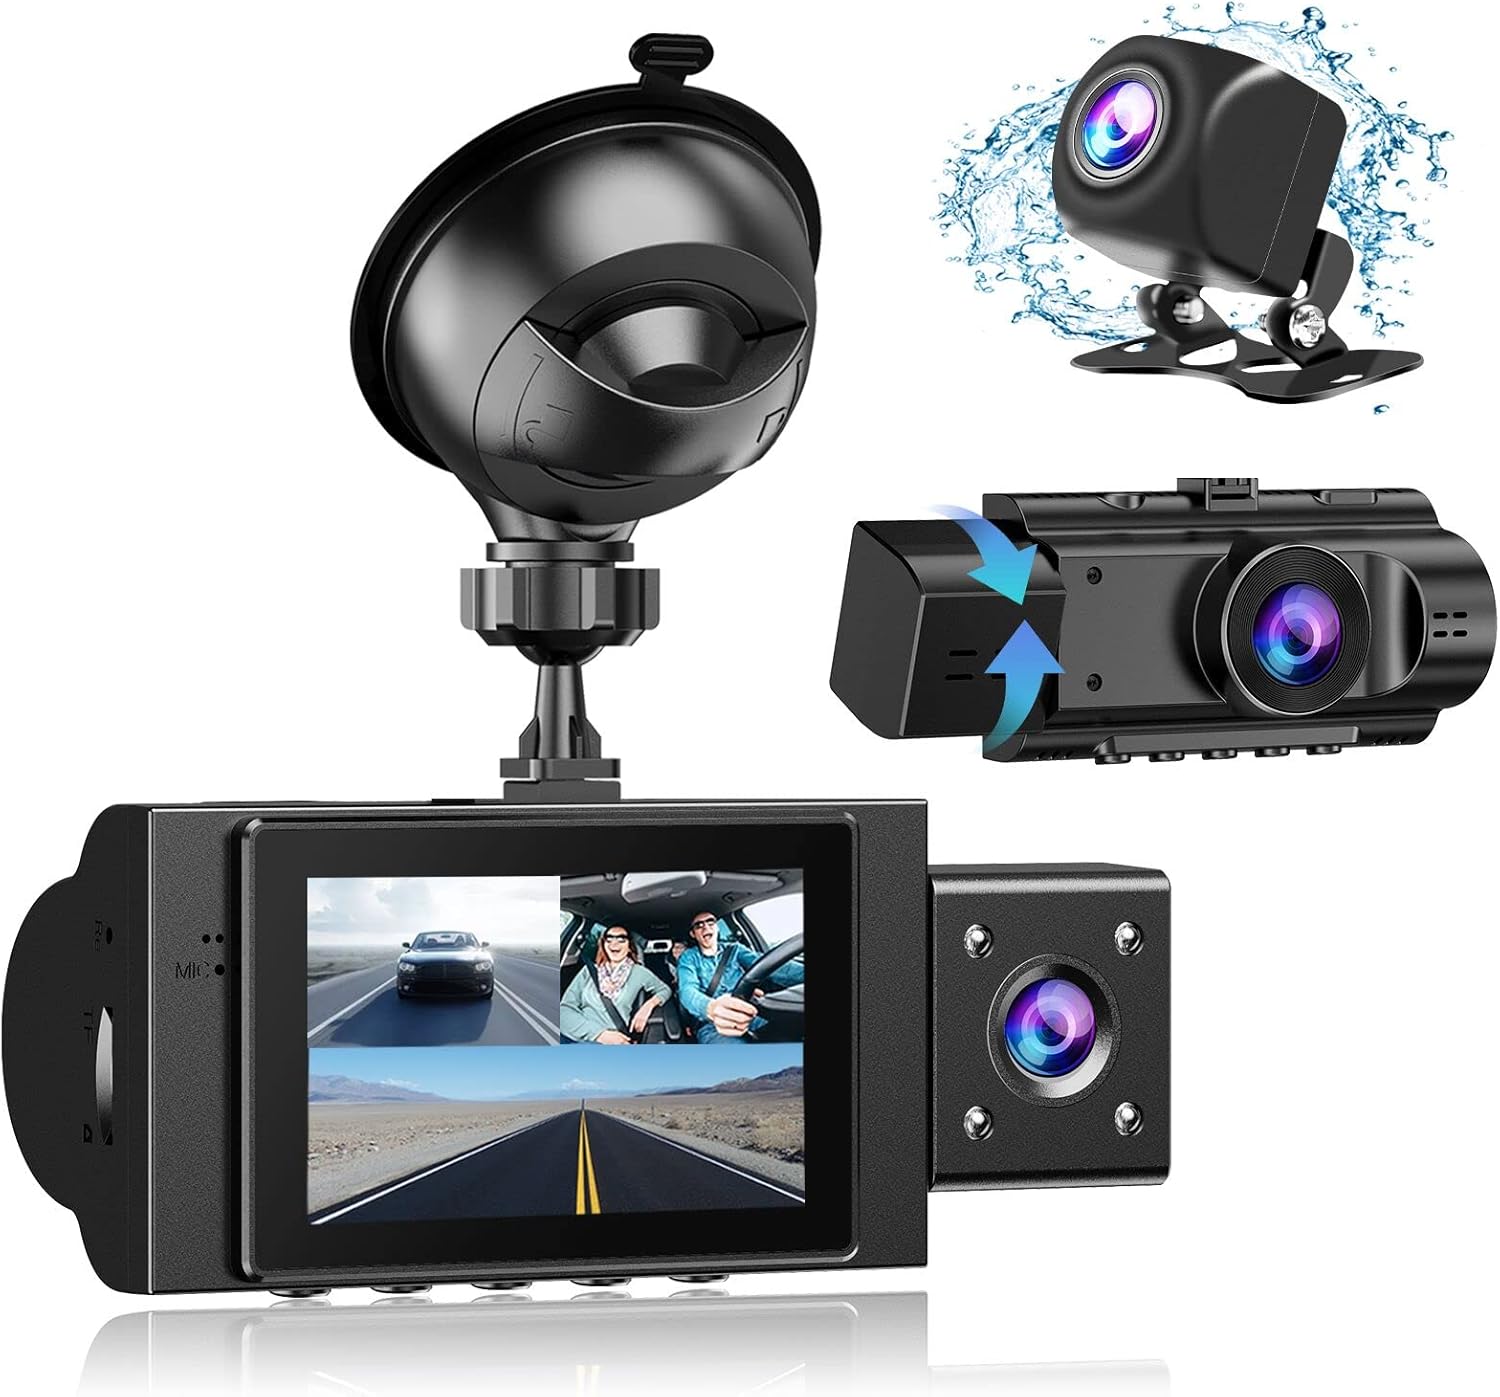
Image: The Yansoo 3-Channel Dash Cam unit with its suction cup mount and the separate rear camera, illustrating the complete package.
2. Saita
2.1 Saka katin ƙwaƙwalwa
The dash cam supports Micro Memory cards up to 64GB (Class 10 or above recommended, not included). Please format the card in the camera menu before first use.
- Locate the memory card slot on the side of the dash cam.
- Insert the Micro Memory card into the slot until it clicks into place.
- Don cirewa, a hankali tura katin har sai ya fito waje.

Image: A four-panel illustration showing the steps to insert a Micro SD card into the dash cam's slot.
2.2 Hawan Dash Cam
Mount the main dash cam unit to your windshield using the provided suction cup mount. Choose a location that does not obstruct your view yayin tuki.
- Tsaftace wurin da aka zaɓa akan gilashin iska sosai.
- Attach the suction cup mount to the dash cam unit.
- Danna kofin tsotsa sosai a kan gilashin mota sannan ka juya lever ɗin don ɗaure shi.
- Daidaita kusurwar kamara don tabbatar da bayyane view na hanyar gaba.

Image: The Yansoo 3-Channel Dash Cam mounted on a car's windshield, showing its position relative to the driver's view.
2.3 Shigar da Kamara ta Baya
The rear camera provides a view of the vehicle's rear. It can be installed inside the rear window or externally above the license plate.
- Haɗa kebul na kyamarar baya zuwa babban na'urar kyamarar dash.
- Route the cable neatly along the vehicle's interior trim to the rear.
- Mount the rear camera in the desired location, ensuring a clear view.

Image: A diagram illustrating the recommended cable routing path for the dash cam and rear camera within a car's interior.
2.4 Haɗin Wuta
Connect the dash cam to your vehicle's cigarette lighter socket using the provided car charger. The camera will automatically power on and begin recording when the vehicle starts.

Image: The Yansoo 3-Channel Dash Cam connected to a power source, indicating its readiness for operation.
3. Umarnin Aiki
3.1 Basic Aiki
- Kunnawa/Kashewa: The camera powers on/off automatically with your vehicle's ignition. You can also manually power on/off by pressing and holding the power button.
- Fara/Dakatar da Rikodi: Recording starts automatically when the camera powers on. Press the "OK" button to manually stop or start recording.
- Canja Nuni Views: Press the "Up" button to cycle through different display modes (Front, Inside, Rear, Picture-in-Picture combinations).
Video: Demonstration of the Yansoo X88 Dash Cam's recording capabilities, showcasing its ability to capture clear video footage.
Video: Footage from the Yansoo X88 Dash Cam demonstrating its clear day and night recording capabilities.
Video: A demonstration of the Yansoo X88 Dash Cam's 1080P Full HD recording quality.
3.2 Menu Saituna
To access the menu settings, stop recording (if active) by pressing the "OK" button, then press the "M" button twice.
- Ƙaddamarwa: Adjust video resolution for front, inside, and rear cameras.
- Rikodin madauki: Set the duration of video segments (e.g., 1, 3, 5 minutes).
- G-Sensor Sensitivity: Adjust the sensitivity of the emergency lock feature.
- Kula da Motar: Enable or disable the parking monitoring function.
- Kwanan wata/Lokaci: Saita madaidaicin kwanan wata da lokaci don ingantaccen lokacinamps akan rikodin.
- Harshe: Zaɓi harshen da kuka fi so don menu.
Video: A step-by-step guide on how to set the date and time on the Yansoo Dash Cam.
4. Kulawa
- Tsara Tsara-Tsare: Format the memory card regularly (e.g., once a month) to prevent data corruption and ensure optimal recording performance.
- Tsaftace Lens: Keep the camera lenses clean using a soft, lint-free cloth. Avoid abrasive materials that could scratch the lens.
- Sabunta Firmware: Check the official Yansoo webshafin yanar gizo don duk wani sabuntawa na firmware da ake da shi don inganta aiki da ƙara sabbin fasaloli.
- La'akari da yanayin zafi: Avoid exposing the dash cam to extreme temperatures for prolonged periods.
5. Shirya matsala
| Matsala | Dalili mai yiwuwa | Magani |
|---|---|---|
| Kamara baya kunnawa. | No power from cigarette lighter; loose connection. | Check car charger connection; ensure vehicle ignition is on. |
| Rikodin ya tsaya ba zato ba tsammani. | Memory card full or corrupted; G-Sensor triggered. | Format memory card; adjust G-Sensor sensitivity. |
| Video footage is blurry. | Protective film on lens; dirty lens. | Remove protective film; clean lenses with a soft cloth. |
| Date/Time is incorrect. | Date/Time not set or battery low. | Set Date/Time in menu; ensure continuous power supply. |
| Kyamara tana daskarewa ko kuma tana da matsala. | Matsalar software. | Use a needle to press the "RE" (Reset) button. |
6. Ƙayyadaddun bayanai
| Siffar | Daki-daki |
|---|---|
| Girman samfur | 4.13 x 1.57 x 1.77 inci |
| Nauyin Abu | 1.23 fam |
| Ƙimar Ɗaukar Bidiyo | 1080p (Front), 720p (Inside & Rear) |
| Filin Daga View | 170° (Front), 140° (Inside), 165° (Rear) |
| Fasahar Haɗuwa | USB |
| Siffa ta Musamman | G-Sensor, Loop Recording, Parking Monitor, Night Vision |
| Nau'in hawa | Tsotse Dutsen |
| Mai ƙira | Yansoo |
7. Garanti da Tallafawa
Yansoo offers comprehensive after-sales support for your dash cam.
- Garanti: 1-YEAR warranty from the date of purchase.
- Sabis na Kasuwanci: 7*24 hours technical service is available.
- Tuntuɓar: For any questions or issues, please contact our customer service team via Amazon or the after-sales email provided in the original product packaging.
- Littafin Mai Amfani (PDF): A digital version of the user manual is available for download nan.


