1. Gabatarwa
This user manual provides detailed instructions for the safe and efficient operation, setup, and maintenance of your FLARING FM155 155Amp 3-in-1 MIG Welder. This versatile machine supports Gasless MIG, Stick, and Lift TIG welding processes, making it suitable for a wide range of applications from home use to professional projects. Please read this manual thoroughly before operating the welder to ensure proper usage and to prevent injury or damage.
2. Bayanin Tsaro
Welding can be dangerous. Always follow safety precautions to prevent serious injury or death. This section outlines general safety guidelines. Refer to local regulations and industry standards for comprehensive safety practices.
- Harkar Lantarki na iya Kashe: Do not touch live electrical parts. Wear dry welding gloves and protective clothing. Ensure the work area is dry.
- Fumes and Gases Can Be Dangerous: Ka kiyaye kan ka daga hayaki. Yi amfani da iska ko shaye-shaye don cire hayaki daga yankin numfashi.
- Welding Can Cause Fire or Explosion: Keep flammables away from the welding area. Have a fire extinguisher readily available.
- Arc Rays na iya ƙone idanu da fata: Wear a welding helmet with a proper shade filter. Wear protective clothing (long sleeves, pants, leather gloves).
- Sassan Zafi Na Iya Hana Mummunan Konewa: Allow welded materials to cool before handling. Use insulated gloves and tongs.
- Always Disconnect Power: Before servicing or moving the unit, ensure the power supply is disconnected.
- Tushen Da Ya dace: Ensure the welder is properly grounded according to electrical codes.
3. Abubuwan Kunshin
Upon opening your FLARING FM155 welder package, please verify that all the following items are included:
- 1 x FLARING 155Amp MIG Welder (FM155)
- 1 x MIG Welding Torch (3M cable)
- 1 x 0.8 Flux Cored Wire (0.5kg)
- 1 x Electrode Holder with Cable (2M)
- 1 x Brush & Hammer
- 1 x Ground Clamp with Cable (2M)
- 4 x Contact Tips
- 2 x Gas Nozzles (Gaiser)
- 1 x Manual mai amfani (wannan takarda)

4. Samfurin Ya Ƙareview
The FLARING FM155 is a compact and powerful 3-in-1 welding machine designed for versatility and ease of use. It features a large LED digital display for clear parameter adjustments and supports multiple welding processes.

4.1 Maɓalli Maɓalli:
- Ayyukan 3-in-1: Capable of Gasless MIG, Stick (MMA), and Lift TIG welding.
- Babban Fitowa: Maximum 155A output, suitable for welding mild steel up to 4mm (3/20").
- Large LED Digital Display: Provides clear readings for welding mode, current, and voltage, enhancing operational clarity.
- Zane Mai šaukuwa: Weighs only 12 pounds with a convenient handle for easy transport.
- Fasahar Inverter IGBT: Ensures stable arc and efficient performance.


5. Saita
5.1 Haɗin Wuta
The FLARING FM155 operates on 110V AC power. Ensure your power source meets the voltage requirements and is properly grounded. Use a dedicated circuit if possible to avoid overloading.
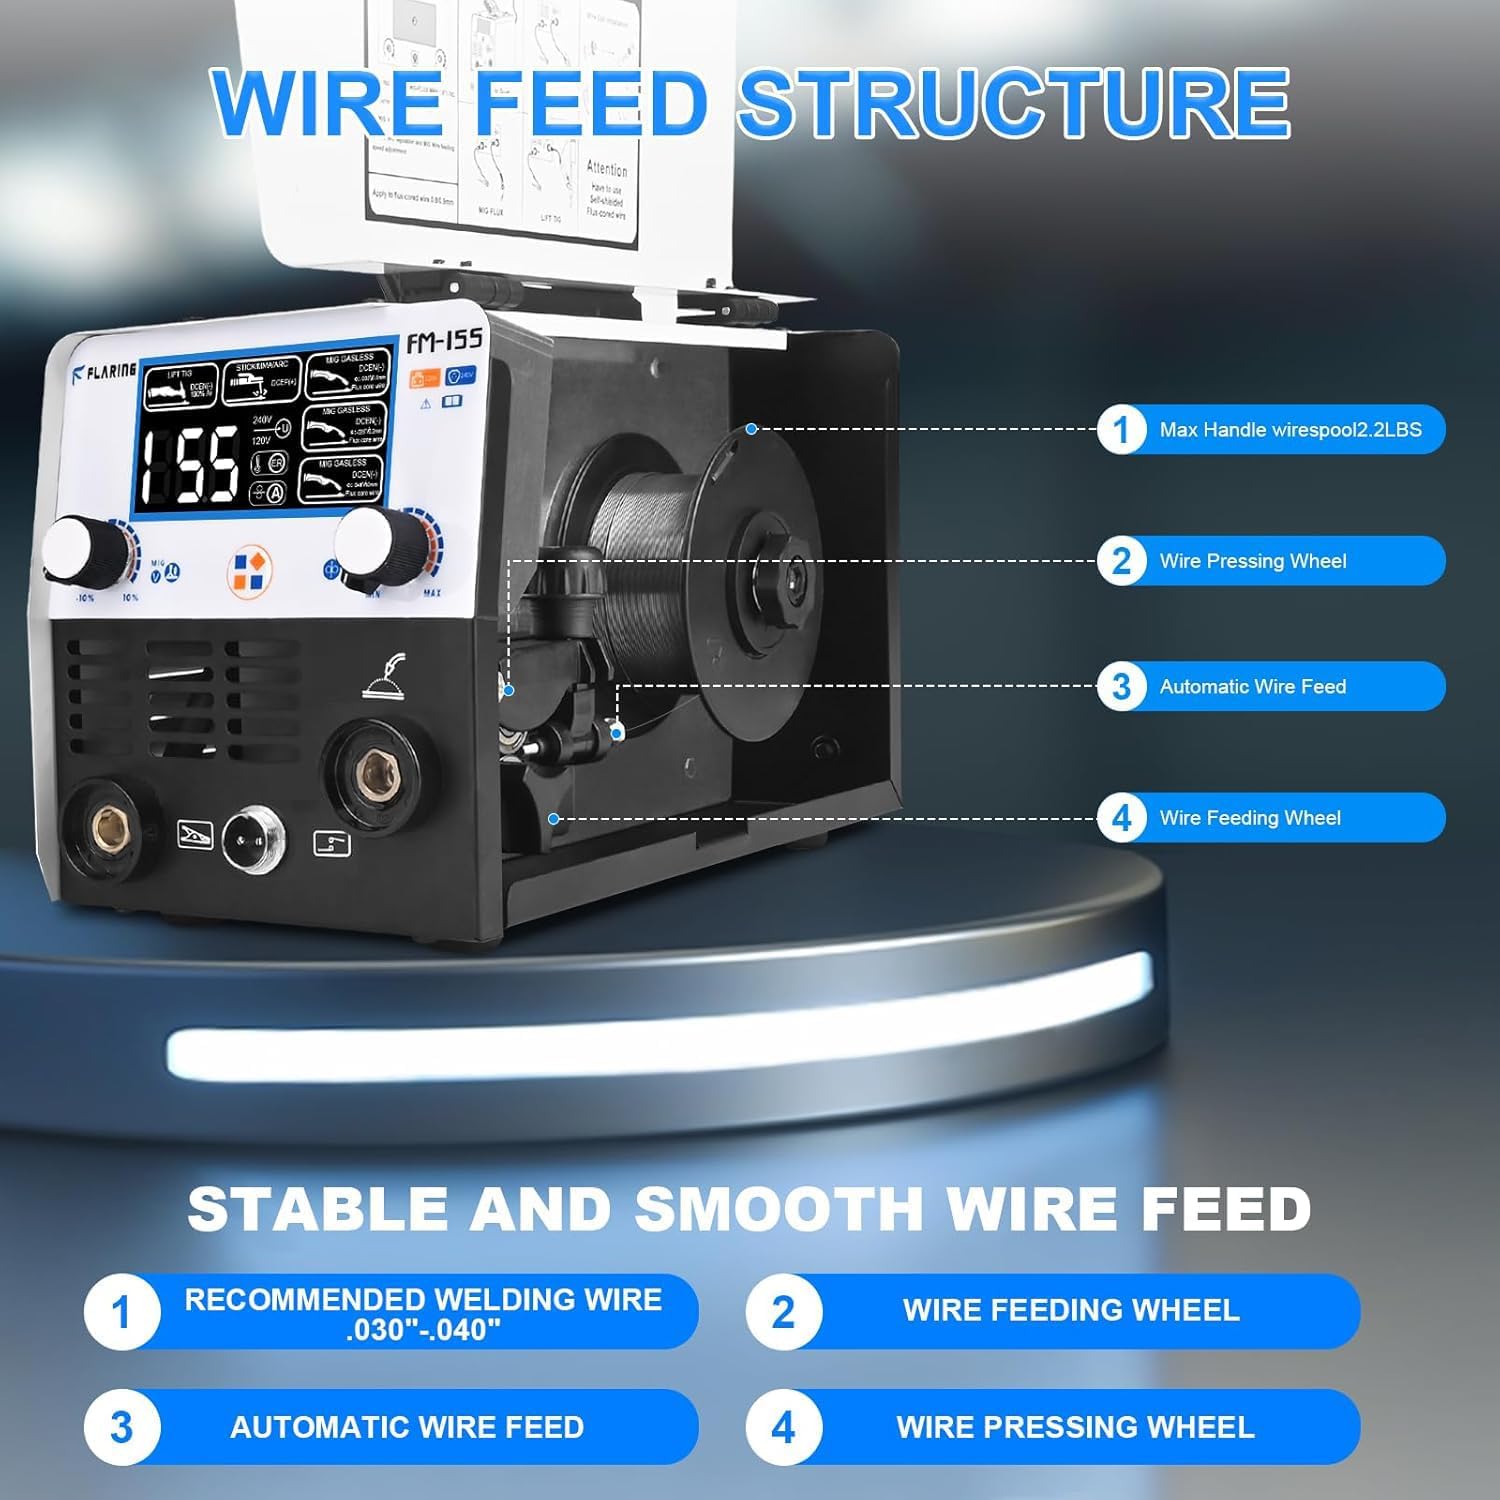
5.2 Wire Installation (Gasless MIG)
For Gasless MIG welding, install the flux-cored wire spool. The machine supports 0.030" (0.8mm), 0.035" (0.9mm), and 0.040" (1.0mm) flux core wire sizes. The included wire is 0.8mm (0.5kg).
- Bude sashin ciyarwar waya.
- Place the wire spool onto the spool retainer. Ensure it rotates freely.
- Feed the wire through the wire guide and into the drive roller mechanism.
- Secure the wire with the wire pressing wheel, ensuring proper tension.
- Rufe sashin.
- Connect the MIG welding torch to the appropriate port on the front panel.
5.3 Electrode Holder and Ground Clamp Connection (Stick/Lift TIG)
For Stick welding or Lift TIG (requires an additional TIG torch), connect the electrode holder and ground clamp:
- Haɗa ƙasa clamp cable to the negative (-) terminal on the welder.
- Connect the electrode holder cable to the positive (+) terminal on the welder.
- Haɗa ƙasa clamp a amince da workpiece ko waldi tebur, tabbatar da kyau lantarki lamba.
6. Umarnin Aiki
The FLARING FM155 offers three welding modes: Gasless MIG, Stick, and Lift TIG. Select the appropriate mode using the controls on the front panel.

6.1 Gasless MIG Welding
Gasless MIG welding uses flux-cored wire, eliminating the need for external shielding gas. This is ideal for outdoor use or when portability is key.
- Ensure flux-cored wire is correctly installed (refer to Section 5.2).
- Select "MIG Gasless" mode on the control panel.
- Adjust current (Amperage) and voltage settings based on the material thickness and wire diameter. The LED display will guide you.
- Position the MIG torch at the desired angle (typically 10-15 degrees from vertical) and maintain a consistent stick-out.
- Press the trigger to initiate the arc and begin welding.
6.2 Stick (MMA) Welding
Stick welding (Manual Metal Arc) is a robust process suitable for various metals and conditions.
- Connect the electrode holder and ground clamp (refer to Section 5.3).
- Select "Stick/MMA/ARC" mode on the control panel.
- Insert the appropriate welding electrode into the electrode holder.
- Adjust the current (Amperage) based on the electrode type and diameter, and material thickness.
- Strike the arc by lightly touching and quickly lifting the electrode from the workpiece. Maintain a consistent arc length and travel speed.
6.3 Lift TIG Welding
Lift TIG welding provides precise control and high-quality welds. An additional Lift TIG torch is required (not included).
- Haɗa ƙasa clamp and your Lift TIG torch (not included) to the welder.
- Select "Lift TIG" mode on the control panel.
- Adjust the current (Amperage) as needed for your material and tungsten size.
- Gently touch the tungsten electrode to the workpiece to initiate the arc, then lift slightly to establish the arc.
- Feed filler rod manually into the weld puddle as you progress.
6.4 Welding Samples
The FLARING FM155 is capable of welding various materials and joint types, including iron block, galvanized pipe, round tube, chair frames, stainless steel, and general steel frames.

7. Kulawa
Regular maintenance ensures the longevity and optimal performance of your FLARING FM155 welder. Always disconnect power before performing any maintenance.
- Tsaftacewa: Periodically clean the exterior of the welder with a dry cloth. Use compressed air to blow out dust and debris from the cooling vents.
- Wire Feed System: Inspect the wire feed rollers and guides for wear or debris. Clean as necessary to ensure smooth wire feeding. Replace worn contact tips and gas nozzles regularly.
- Duban Kebul: Check all cables (power, MIG torch, electrode holder, ground clamp) for cuts, fraying, or damaged insulation. Replace damaged cables immediately.
- Ajiya: Store the welder in a clean, dry environment, away from excessive dust, moisture, and extreme temperatures.

8. Shirya matsala
This section addresses common issues you might encounter with your FLARING FM155 welder. If the problem persists after attempting these solutions, please contact customer support.
| Matsala | Dalili mai yiwuwa | Magani |
|---|---|---|
| Babu iko ga naúrar. | Power cord unplugged, circuit breaker tripped, faulty power outlet. | Check power connections, reset circuit breaker, try a different outlet. |
| Babu baka. | Poor ground connection, incorrect welding mode, wrong settings, faulty torch/electrode holder. | Tabbatar ƙasa clamp is secure, verify welding mode, adjust current/voltage, inspect torch/holder for damage. |
| Wire not feeding (MIG). | Wire tangled, drive roller tension incorrect, contact tip clogged, liner clogged. | Check wire spool, adjust drive roller tension, clean/replace contact tip, inspect/clean torch liner. |
| Rashin ingancin walda. | Incorrect settings, improper technique, contaminated workpiece, wrong wire/electrode. | Adjust settings, practice technique, clean workpiece thoroughly, use correct consumables. |
| Overheat indicator on. | Exceeded duty cycle, insufficient ventilation. | Allow the machine to cool down. Ensure adequate airflow around the welder. |
9. Ƙayyadaddun bayanai
Detailed technical specifications for the FLARING FM155 3-in-1 MIG Welder:
| Siffa | Daki-daki |
|---|---|
| Lambar Samfura | FM155-42US |
| Mai ƙira | FASAHA |
| Nauyin Abu | 14.17 fam |
| Girman samfur | 11.42 x 5.63 x 6.89 inci |
| Tushen wutar lantarki | AC |
| Voltage | 110 Volts |
| Max fitarwa na yanzu | 155 Amps |
| Hanyoyin walda | Gasless MIG, Stick (MMA), Lift TIG |
| Supported Wire Sizes | 0.030" (0.8mm), 0.035" (0.9mm), 0.040" (1.0mm) flux core wire |
| Max Welding Thickness | Up to 3/20" (4mm) mild steel |

10. Garanti da Tallafawa
For warranty information, technical support, or service inquiries regarding your FLARING FM155 welder, please refer to the contact details provided on the product packaging or visit the official FLARING website. Ajiye rasidin siyan ku azaman shaidar siyan don da'awar garanti.
Hakanan zaka iya ziyartar wurin FLARING Store on Amazon don ƙarin bayani da albarkatun tallafi.
Takardu masu alaƙa - FM155-42US
 |
FLARING FM-215 MIG Welding Machine Operation Manual Comprehensive operation manual for the FLARING FM-215 MIG Welding Machine. This guide covers installation, operation, technical parameters, troubleshooting, maintenance, safety precautions, and warranty information for this versatile IGBT inverter welding equipment. |
 |
PARKSIDE Tube Flaring Tool: Instructions and Warranty A comprehensive guide to using the PARKSIDE tube flaring tool for creating single and double flares. This document provides step-by-step instructions, details on preparation, operation, and warranty information, ensuring proper use and maintenance of the tool. |
 |
VEVOR Manual Tube Expander Kit KKQ-1750 - User Manual and Operating Instructions Detailed user manual and operating instructions for the VEVOR Manual Tube Expander Kit, Model KKQ-1750. Learn how to safely use and maintain this professional tool for flaring brake pipes. |
 |
Kit ɗin Faɗaɗa Tube na VEVOR CT-3300A - Jagorar Mai Amfani da Umarnin Tsaro Wannan littafin jagorar mai amfani yana ba da cikakkun bayanai game da aiki da kuma kula da Kayan Faɗaɗa Tube na VEVOR CT-3300A Manual. Ya ƙunshi matakan kariya, shiri, saita kayan aiki, da kuma aiki don fitar da nau'ikan bututu daban-daban. |
 |
Kayan aiki na Bututun Birki Mai Ƙarfi na Sealey PFT12 akan Mota 3/16" SAE - Umarni & Aiki Cikakken umarni da bayanai game da kayan aikin bututun birki na Sealey PFT12 akan abin hawa, wanda aka tsara don bututun SAE mai inci 3/16. Koyi game da aminci, shiri, da ƙirƙirar walƙiya ɗaya da biyu. |